- Potential Causes & Solutions for Non-Starting Lawn Mower
- Service Table for Troubleshooting a JD Lawn Mower That Won’t Start
- How to Inspect the Spark Plug
- How to Inspect, Clean, Recharge or Replace the Battery
- How to Clean or Replace the Air Filter
- How to Refill the Engine Oil to the Appropriate Level
- How to Clean or Replace the Fuel Line & Filter
- F.A.Q. for John Deere Lawn Mower Won’t Start
Maintaining a well-manicured lawn requires a reliable and efficient lawn mower, and John Deere has long been recognized as a trusted brand in the industry. However, even the most reliable equipment can encounter issues from time to time. One frustrating situation many homeowners face is when their John Deere lawn mower refuses to start (100, 200, X300, X500, X700 Series). If you find yourself in this predicament, don’t worry! In this troubleshooting guide, we will explore common reasons why your John Deere lawn mower (lawn tractor, riding lawn mowers or residential zero-turn mowers) may not start and provide you with practical steps to diagnose and potentially resolve the issue. By following these troubleshooting steps, you can get your John Deere lawn mower back up and running, ensuring a beautifully manicured lawn in no time.
Potential Causes & Solutions for Non-Starting Lawn Mower
I understand that you’re looking for troubleshooting solutions for a John Deere lawn mower that won’t start. While I can provide general guidance, it’s important to note that diagnosing specific issues without visual inspection or direct expertise can be challenging.
Nonetheless, I’ll offer some common troubleshooting steps that may help you identify potential causes and solutions for your non-starting John Deere lawn mower (riding lawn mowers, lawn tractor or residential zero-turn mowers):
- Check the fuel level: Ensure that there is sufficient fuel in the tank. If the fuel level is low, refuel the mower.
- Inspect the spark plug: A faulty or dirty spark plug can prevent the engine from starting. Remove the spark plug and examine it for signs of damage or wear. Clean or replace the spark plug as necessary.
- Check the air filter: A clogged or dirty air filter can restrict airflow and cause starting problems. Inspect the air filter and clean or replace it if it appears dirty or damaged.
- Verify the safety features: Many lawn mowers have safety features, such as a seat switch or blade engagement safety switch. Ensure that these features are properly engaged or deactivated, as failure to do so can prevent the engine from starting.
- Examine the battery: If your John Deere lawn mower has an electric starter, check the battery for adequate charge. If the battery is dead or low on power, recharge or replace it.
- Inspect the fuel system: Check the fuel lines and fuel filter for blockages or damage. Clean or replace any clogged filters or lines.
- Ensure proper oil levels: Lack of oil or insufficient oil levels can lead to engine problems. Check the oil level and top up if necessary. If the oil appears dirty or contaminated, consider changing it.
- Test the ignition switch and wiring: Faulty ignition switches or damaged wiring can prevent the mower from starting. Inspect the ignition switch and wiring connections for any issues.
If none of these steps resolve the problem, it may be necessary to consult a professional or authorized John Deere service center for further assistance. Remember to record important details such as fuel consumption type, maintenance history, and any other relevant information to help the technician diagnose and resolve the issue more effectively.
Service Table for Troubleshooting a JD Lawn Mower That Won’t Start
Here’s a service table for troubleshooting a John Deere lawn mower that won’t start:
| Issue | Possible Causes | Potential Solutions |
|---|---|---|
| Lack of Fuel | Empty or low fuel tank | Refill the fuel tank |
| Faulty Spark Plug | Worn-out or damaged spark plug | Clean or replace the spark plug |
| Clogged Air Filter | Dirty or clogged air filter | Clean or replace the air filter |
| Safety Features Not Engaged | Seat switch not engaged or blade engagement safety switch not deactivated | Ensure proper engagement or deactivation of safety features |
| Weak or Dead Battery | Low battery charge | Recharge or replace the battery |
| Insufficient Oil Levels | Low or no oil in the engine | Refill the engine oil to the appropriate level |
| Faulty Ignition Switch or Wiring | Damaged ignition switch or wiring | Inspect and replace the faulty parts if necessary |
| Engine Flooded | Over-priming or excessive choke usage | Allow the engine to sit for a while and try starting with less priming or choke |
| Carburetor Issues | Clogged or dirty carburetor | Clean or adjust the carburetor as per manufacturer’s instructions |
| Fuel System Issues | Clogged fuel line or filter | Clean or replace the fuel line and filter |
| Mechanical Malfunction | Engine components or parts failure | Consult a professional or authorized John Deere service center for diagnosis and repair |
Please note that this table provides a general overview of potential causes and solutions, but the specific troubleshooting steps may vary depending on your John Deere lawn mower model and engine type.
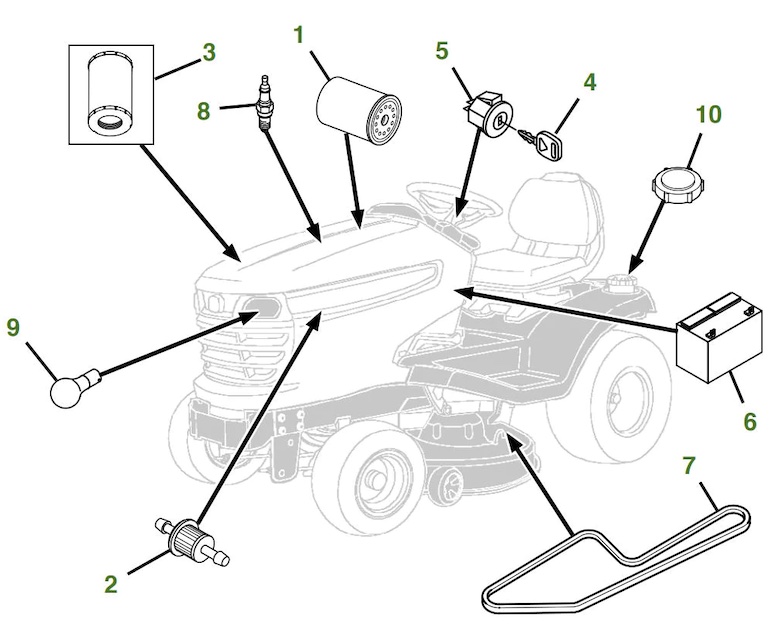
(1 – Engine Oil Filter, 2 – Fuel Filter, 3 – Air Filter, 4 – Key, 5 – Ignition Switch, 6 – Battery, 7 – Traction Drive Belt, 8 – Spark Plug, 9 – Headlight Bulb, 10 – Transmission Filter).
Always refer to the manufacturer’s manual for detailed instructions and safety precautions. If the problem persists, it’s recommended to seek professional assistance for a more accurate diagnosis and repair.
How to Inspect the Spark Plug
Here’s a step-by-step guide on how to inspect the spark plug if your John Deere lawn mower won’t start:
- Safety first: Ensure that the lawn mower is turned off and the spark plug wire is disconnected to prevent accidental starts. Allow the engine to cool down before proceeding.
- Locate the spark plug: The spark plug is typically positioned on the side or top of the engine cylinder. Refer to your John Deere lawn mower’s manual to find the exact location.
- Clean the area around the spark plug: Before removing the spark plug, use a clean cloth or rag to wipe away any dirt or debris around the area. This prevents contaminants from entering the engine when inspecting the spark plug.
- Remove the spark plug: Using a spark plug socket and a ratchet or a spark plug wrench, carefully loosen and unscrew the spark plug in a counterclockwise direction. Once it is loose, remove it from the engine cylinder.
- Inspect the spark plug: Examine the spark plug for any signs of damage, such as fouling, corrosion, or excessive wear. Check the electrode tip for signs of carbon buildup or deposits. A healthy spark plug should have a clean and light brownish color on the electrode.
- Clean the spark plug (if necessary): If the spark plug is dirty or fouled, you can attempt to clean it. Use a wire brush or spark plug cleaner to remove any carbon deposits or debris from the electrode and insulator. Be gentle to avoid damaging the spark plug.
- Measure the spark plug gap: Use a spark plug gap gauge to measure the gap between the center electrode and the ground electrode. Refer to your lawn mower’s manual to determine the correct gap specification. If the gap is too wide or too narrow, adjust it carefully using the appropriate tool.
- Check the spark plug condition: Evaluate the overall condition of the spark plug. If it appears damaged, heavily fouled, or worn, it is recommended to replace it with a new one. Ensure that you use the correct spark plug type and specification recommended for your John Deere lawn mower.
- Install the spark plug: Carefully thread the spark plug back into the engine cylinder by hand, ensuring it is aligned properly. Use the spark plug socket and ratchet or spark plug wrench to tighten it snugly, but avoid overtightening.
- Reconnect the spark plug wire: Once the spark plug is securely installed, reconnect the spark plug wire to the spark plug terminal.
- Start the lawn mower: Attempt to start the lawn mower following the starting instructions provided in the manual. Check if the issue is resolved.
If inspecting and cleaning the spark plug does not resolve the starting issue, it is recommended to consult a professional or authorized John Deere service center for further diagnosis and repair.
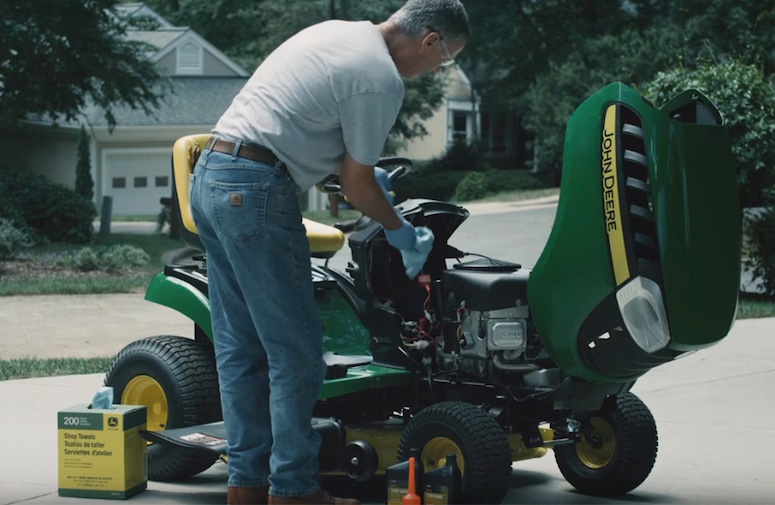
How to Inspect, Clean, Recharge or Replace the Battery
Here’s a step-by-step guide on how to inspect, clean, recharge or replace the battery if your John Deere lawn mower won’t start:
- Safety first: Ensure that the lawn mower is turned off and the spark plug wire is disconnected to prevent accidental starts.
- Locate the battery: The battery is typically located under the hood or seat of your John Deere lawn mower. Consult your mower’s manual to find the specific location.
- Connect the charger: If your mower has a rechargeable battery, locate the charging port and connect the battery charger to it. Ensure that the charger is compatible with the battery type and voltage.
- Follow the charger instructions: Refer to the battery charger’s user manual for specific instructions on how to recharge the battery. Typically, you will need to plug in the charger and set it to the appropriate charging mode based on the battery type and recommended charging time.
- Charge the battery: Allow the battery to charge fully according to the charger’s instructions. Charging times may vary depending on the battery capacity and charger specifications. Monitor the charging process and ensure that the charger is functioning properly.
- Disconnect the charger: Once the battery is fully charged, disconnect the charger from the charging port.
- Secure the battery: If there are securing brackets or clamps, reattach them to hold the battery firmly in place.
- Reconnect the spark plug wire: Once the new battery is installed, reconnect the spark plug wire to its terminal.
- Start the lawn mower: With the recharged or replaced battery in place, attempt to start the lawn mower. Follow the starting instructions provided in the manual and check if the issue is resolved.
If the battery replacement or recharge does not resolve the starting issue, it is recommended to consult a professional or authorized John Deere service center for further diagnosis and repair.
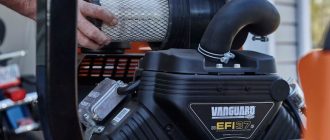
How to Clean or Replace the Air Filter
Here’s a step-by-step guide on how to clean or replace the air filter if your John Deere lawn mower won’t start:
- Safety first: Ensure that the lawn mower is turned off and the spark plug wire is disconnected to prevent accidental starts.
- Locate the air filter: The air filter is usually located on the side or top of the engine. Refer to your John Deere lawn mower’s manual for the exact location.
- Remove the air filter cover: Depending on the model, you may need to use a screwdriver or simply unclip the cover to access the air filter. Remove any screws or fasteners holding the cover in place.
- Remove the old air filter: Take out the old air filter from its housing. Pay attention to how the filter is positioned so that you can properly install the new one.
- Inspect the air filter: Check the condition of the old air filter. If it’s dirty, clogged, or damaged, it’s best to replace it. A clean air filter will appear light in color, while a dirty one will be darker and may have visible dirt or debris.
- Clean the air filter (if reusable): If the air filter is reusable and only mildly dirty, you can clean it. Gently tap it against a hard surface to remove loose dirt. Then, use compressed air or a soft brush to remove any remaining debris. Ensure that the filter is completely dry before reinstalling.
- Replace with a new air filter (if necessary): If the air filter is heavily soiled, damaged, or if it’s been a long time since you replaced it, it’s recommended to install a new one. Match the new filter with the old one or refer to the manual to ensure compatibility.
- Install the new or cleaned air filter: Position the new or cleaned air filter back into the air filter housing, making sure it fits securely. Ensure that the filter is properly seated and aligned with any tabs or grooves.
- Reattach the air filter cover: Place the air filter cover back in position and secure it with screws or fasteners. Make sure it is tightly secured to prevent any debris from entering the engine.
- Reconnect the spark plug wire: Once the air filter is installed and the cover is securely in place, reconnect the spark plug wire to its terminal.
- Start the lawn mower: With the air filter cleaned or replaced, you can now attempt to start the lawn mower. Follow the starting instructions provided in the manual and see if the issue is resolved.
Cleaning or replacing the air filter can help ensure proper air intake and improve engine performance, which may contribute to resolving starting issues. However, if the problem persists, it is recommended to consult a professional or authorized John Deere service center for further diagnosis and repair.
How to Refill the Engine Oil to the Appropriate Level
Here’s a step-by-step guide on how to refill the engine oil to the appropriate level if your John Deere lawn mower won’t start:
- Safety first: Ensure that the lawn mower is turned off and the spark plug wire is disconnected to prevent accidental starts. Allow the engine to cool down before proceeding.
- Locate the oil fill cap and dipstick: The oil fill cap is typically located on the top or side of the engine, and the dipstick is attached to it. Consult your John Deere lawn mower’s manual for the exact location.
- Clean the area around the oil fill cap: Before removing the oil fill cap, use a clean cloth or rag to wipe away any dirt or debris around the cap. This prevents contaminants from entering the engine when refilling the oil.
- Remove the oil fill cap: Unscrew the oil fill cap counterclockwise to remove it. Set it aside in a safe place.
- Check the current oil level: Dip the dipstick into the oil reservoir, then remove and examine it. The dipstick usually has markings indicating the proper oil level range. Ensure that the oil level falls within the recommended range. If the oil is low or absent, continue to the next steps.
- Prepare the new oil: Obtain the correct type and viscosity of engine oil recommended by John Deere for your lawn mower. Refer to the owner’s manual or check the specifications label on the mower for this information.
- Pour the oil: Using a funnel to avoid spills, slowly pour the new oil into the oil fill opening. Pour in small increments and periodically check the oil level using the dipstick to prevent overfilling.
- Check the oil level: Insert the dipstick fully into the oil reservoir, remove it, and examine the oil level. Ensure that the oil level is within the recommended range indicated on the dipstick. If necessary, add more oil in small amounts until the correct level is reached.
- Recap and secure: Once the oil level is correct, wipe the dipstick clean, reinsert it into the oil fill opening, and screw the oil fill cap on tightly.
- Reconnect the spark plug wire: With the oil properly refilled, reconnect the spark plug wire to its terminal.
- Start the lawn mower: Attempt to start the lawn mower following the starting instructions provided in the manual. Check if the issue is resolved.
Proper oil levels are essential for the smooth operation and longevity of the engine. If refilling the oil does not resolve the starting issue, it is recommended to consult a professional or authorized John Deere service center for further diagnosis and repair.
How to Clean or Replace the Fuel Line & Filter
Here’s a step-by-step guide on how to clean or replace the fuel line and filter if your John Deere lawn mower won’t start:
- Safety first: Ensure that the lawn mower is turned off and the spark plug wire is disconnected to prevent accidental starts.
- Locate the fuel line and filter: The fuel line is a hose that connects the fuel tank to the engine, and the fuel filter is typically positioned along this line. Refer to your John Deere lawn mower’s manual to find the exact location of the fuel line and filter.
- Gather the necessary tools and replacement parts: You may need a pair of pliers, a small container to catch fuel, a replacement fuel line, and a replacement fuel filter (if necessary). Ensure that you have the correct replacement parts that match your lawn mower’s specifications.
- Prepare for fuel line disconnection: Place the container beneath the fuel line to catch any fuel that may spill out during the process.
- Disconnect the fuel line: Use pliers to carefully loosen the clamps or connectors securing the fuel line to the fuel tank and the carburetor. Slide the clamps away from the fuel line, then carefully pull the fuel line off the fittings.
- Remove the fuel filter: If your John Deere lawn mower has a fuel filter, disconnect it from the fuel line. Pay attention to the orientation of the filter for proper installation of the replacement.
- Inspect the fuel line and filter: Examine the fuel line and filter for any signs of damage, clogs, or debris. If the fuel line is cracked, brittle, or clogged, it’s recommended to replace it. If the fuel filter appears dirty, clogged, or damaged, it’s best to replace it as well.
- Clean or replace the fuel line: If the fuel line is clogged but still in good condition, you can clean it by blowing compressed air through it or using a small brush to remove debris. If it is damaged or severely clogged, it’s better to replace the fuel line entirely.
- Replace the fuel filter (if necessary): Install the new fuel filter onto the fuel line in the proper orientation. Ensure that it is securely attached and that any arrows or flow direction indicators are aligned correctly.
- Reconnect the fuel line: Slide the clamps or connectors back onto the fuel line and position them over the fittings on the fuel tank and carburetor. Use pliers to tighten the clamps or connectors, ensuring a secure connection.
- Reconnect the spark plug wire: Once the fuel line and filter are cleaned or replaced, reconnect the spark plug wire to its terminal.
- Start the lawn mower: Attempt to start the lawn mower following the starting instructions provided in the manual. Check if the issue is resolved.
Cleaning or replacing the fuel line and filter can help ensure proper fuel flow and prevent starting issues. If the problem persists, it is recommended to consult a professional or authorized John Deere service center for further diagnosis and repair.
F.A.Q. for John Deere Lawn Mower Won’t Start
Here’s an FAQ section for troubleshooting a John Deere lawn mower that won’t start:
Q: Why won’t my John Deere lawn mower start? A: There could be several reasons why your John Deere lawn mower won’t start. Common causes include a lack of fuel, a faulty spark plug, a clogged air filter, safety features not engaged, a weak or dead battery, insufficient oil levels, a faulty ignition switch or wiring, a flooded engine, carburetor issues, fuel system issues, or mechanical malfunctions.
Q: What should I do if my John Deere lawn mower won’t start? A: Start by checking the fuel level and refilling if necessary. Ensure the spark plug is clean and properly connected. Clean or replace the air filter to ensure proper air intake. Check if safety features like the seat switch or blade engagement switch are properly engaged or deactivated. Recharge or replace the battery if it is weak or dead. Refill the engine oil to the appropriate level. Inspect the ignition switch and wiring for any damage. Allow a flooded engine to sit before attempting to start again. Clean or adjust the carburetor and check for clogged fuel lines or filters. If none of these steps resolve the issue, it’s recommended to seek professional assistance.
Q: How often should I clean or replace the air filter? A: The frequency of air filter cleaning or replacement depends on various factors such as operating conditions and the amount of debris encountered. As a general guideline, it is recommended to inspect the air filter before each mowing session and clean or replace it as needed. If the air filter appears dirty, clogged, or damaged, it’s best to clean or replace it promptly to ensure optimal engine performance.
Q: How do I know if my lawn mower’s battery needs recharging or replacement? A: If your John Deere lawn mower won’t start and the battery is the likely culprit, start by checking the battery connections to ensure they are secure. If the battery connections are fine, use a voltmeter to measure the battery voltage. If the voltage is significantly below the manufacturer’s recommended level, it indicates a weak or discharged battery that needs recharging or replacement.
Q: Can I clean the fuel line and filter myself? A: Yes, cleaning the fuel line and filter can be done by following the proper steps. However, it requires some mechanical knowledge and the use of appropriate tools. If you are unsure or uncomfortable with this task, it’s recommended to consult a professional or authorized John Deere service center for assistance.
Q: What should I do if none of the troubleshooting steps resolve the issue? A: If your John Deere lawn mower still won’t start after following the troubleshooting steps, it’s best to consult a professional or authorized John Deere service center for a more accurate diagnosis and repair. Trained technicians will have the expertise and specialized equipment to identify and resolve the underlying issue effectively.


How can I determine if the battery is the problem?
You can check the battery by using a multimeter to measure its voltage. If the battery voltage is low or it’s not holding a charge, it may need to be recharged or replaced.
How can I prevent problems starting my John Deere lawn mower in the future?
Yes, regular maintenance is key to preventing starting problems. Perform routine checks on the battery, spark plug, air filter, fuel system, and safety switches. Keep the mower clean and follow the manufacturer’s recommended maintenance schedule.
Can a dirty spark plug cause my John Deere lawn mower not to start?
Yes, a dirty or fouled spark plug can lead to starting issues. Check the spark plug’s condition and replace it if it appears worn, fouled, or has significant carbon deposits.
Remember, proper maintenance and timely troubleshooting can help keep your John Deere lawn mower running smoothly and reliably. Always refer to the operator’s manual for specific instructions and safety guidelines. If you are uncertain about any troubleshooting steps, consult with a professional for assistance.