- Service Table for Cub Cadet Lawn Mower Won’t Start
- Cub Cadet Lawn Mower Service Tools & Equipment
- How to Test a Lawn Mower Battery: a Step-by-Step Guide
- How to Inspect Cub Cadet Lawn Mower Spark Plug
- How to Check a Lawn Mower Air Filter
- How to Examine a Lawn Mower Fuel Filter
- How to Inspect the Ignition System in Your Lawn Mower
- How to Test & Reinstall the Carburetor in Your Lawn Mower
- How to Check the Oil Level
- How to Test a Riding Lawn Mower Safety Switch
- Cub Cadet Lawn Mower Won’t Start FAQ
Your Cub Cadet Lawn Mower Won’t Start? Don’t worry, we’re here to help! Whether it’s an issue with the battery, fuel system, spark plug, or other components, our expertise in troubleshooting Cub Cadet lawnmowers will guide you through the process of diagnosing the problem and suggesting the necessary solutions. By visually inspecting the mower and examining its engine parts, we’ll help you determine the root cause of the starting issue, such as power-related issues or fuel problems.
Additionally, we’ll provide you with the information you need to record details like fuel consumption type and any damaged components. So, let’s dive in and get your Cub Cadet lawn mower back to its cutting prowess in no time!
Service Table for Cub Cadet Lawn Mower Won’t Start
Here’s a service table for troubleshooting a Cub Cadet lawn mower that won’t start:
| Issue | Possible Cause | Solution |
|---|---|---|
| Battery | Dead or weak battery | Charge or replace the battery |
| Fuel System | Empty or contaminated fuel tank | Refill with clean fuel or clean/replace the fuel filter |
| Ignition System | Faulty spark plug or ignition coil | Inspect and replace the spark plug or ignition coil |
| Engine Oil | Insufficient or dirty engine oil | Check and refill or change the engine oil |
| Safety Switches | Engage/disengage switch not functioning | Check and replace any faulty safety switches |
| Carburetor | Clogged or malfunctioning carburetor | Clean or rebuild the carburetor, or replace if necessary |
| Air Filter | Dirty or clogged air filter | Clean or replace the air filter |
| Starter Motor | Faulty starter motor or solenoid | Test and replace if necessary |
| Wiring and Connections | Loose or damaged wiring or connections | Inspect and repair or replace as needed |
| Engine Overload | Engine overloaded or blocked | Remove any obstructions and let the engine cool down |
Note: The table provides a general overview of potential causes and solutions. Always refer to the specific model’s manual for detailed instructions and consult a professional if needed.
Cub Cadet Lawn Mower Service Tools & Equipment
When troubleshooting a riding lawn mower that won’t start, you may need the following tools and equipment:
- Spark plug wrench or socket set: Used to remove and inspect the spark plug.
- Multimeter: Helps to check the voltage and continuity of electrical components.
- Fuel container: Used to drain and refill the fuel tank if needed.
- Fuel line clamp: Helps to clamp the fuel line during maintenance or repairs.
- Screwdrivers: Various sizes and types may be required for removing screws and panels.
- Pliers: Used for gripping and manipulating small parts.
- Carburetor cleaner: Helps to clean and remove debris from the carburetor.
- Air compressor or compressed air: Used to blow out dirt and debris from the engine and components.
- Safety goggles and gloves: Protects your eyes and hands during maintenance procedures.
- Shop manual or owner’s manual: Provides specific instructions and diagrams for your mower model.
These tools and equipment may vary depending on the specific issues you are troubleshooting.

It’s always a good idea to consult the owner’s manual for your specific riding lawn mower model to ensure you have the necessary tools and equipment for troubleshooting and maintenance tasks.
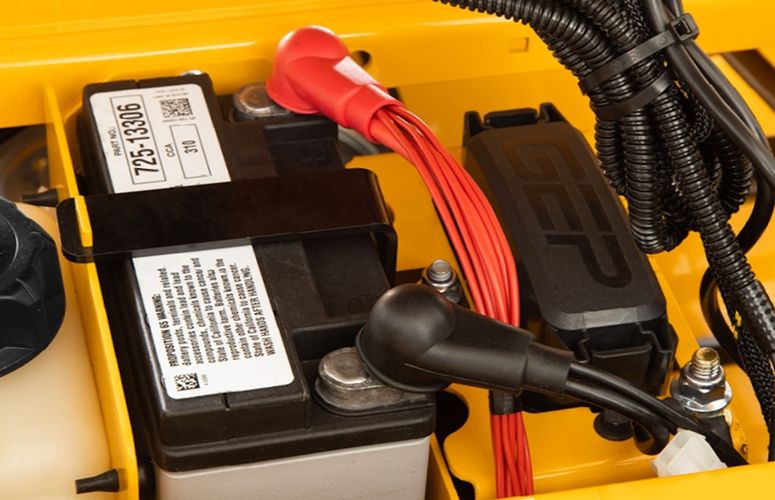
How to Test a Lawn Mower Battery: a Step-by-Step Guide
To check the battery of your Cub Cadet lawn mower when it won’t start, follow these step-by-step instructions:
- Safety first: Ensure the ignition switch is in the off position and remove the key from the ignition.
- Locate the battery: The battery is usually located under the hood or seat of your Cub Cadet lawn mower. Refer to the owner’s manual for the exact location.
- Inspect the battery connections: Check the battery terminals for any corrosion or loose connections. Corrosion can be cleaned using a mixture of baking soda and water or a battery terminal cleaner. Tighten any loose connections using a wrench or pliers.
- Test the battery voltage: Use a multimeter set to DC voltage to measure the battery voltage. Connect the positive (red) probe to the positive terminal of the battery and the negative (black) probe to the negative terminal. The battery voltage should be around 12.6 to 12.8 volts for a fully charged battery.
- Charge or replace the battery: If the battery voltage is below 12.4 volts, it may need to be recharged. Use a battery charger appropriate for your battery type and follow the manufacturer’s instructions to recharge it. If the battery fails to hold a charge or is significantly discharged, it may need to be replaced with a new one.
- Reinstall the battery: Once the battery is fully charged or replaced, reattach the battery cables to the correct terminals. Connect the positive cable (usually red) to the positive terminal (+) and the negative cable (usually black) to the negative terminal (-). Ensure the connections are tight.
- Test the mower: With the battery reinstalled and connections secure, attempt to start the mower. If the battery was the cause of the starting issue, the mower should now start. If not, further troubleshooting may be necessary.
Remember to always follow safety precautions when working with batteries, such as wearing gloves and safety glasses, and consult the owner’s manual for specific instructions related to your Cub Cadet lawn mower model.
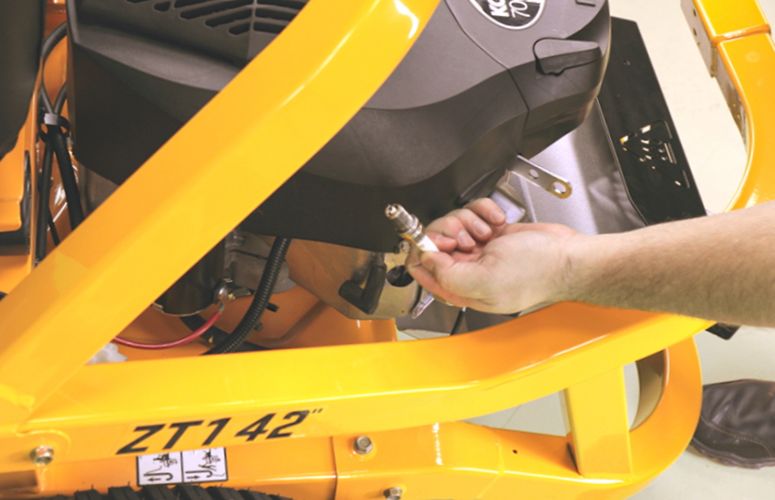
How to Inspect Cub Cadet Lawn Mower Spark Plug
To inspect the spark plug of your Cub Cadet lawn mower when it won’t start, follow these step-by-step instructions:
- Safety first: Ensure the ignition switch is in the off position and remove the key from the ignition. Allow the engine to cool down completely before proceeding.
- Locate the spark plug: The spark plug is typically located on the side or top of the engine cylinder. Refer to the owner’s manual for the exact location and specifications of the spark plug for your Cub Cadet lawn mower model.
- Remove the spark plug wire: Carefully disconnect the spark plug wire from the spark plug. Grip the boot (rubber cap) firmly and pull it straight off the spark plug. Be cautious not to pull on the wire itself.
- Clean the spark plug: Use a clean cloth or wire brush to clean any debris or carbon buildup around the spark plug. Make sure the area around the spark plug is free from dirt and grime to prevent any contaminants from entering the combustion chamber.
- Inspect the spark plug condition: Examine the spark plug electrode for signs of damage, wear, or fouling. A healthy spark plug should have a light brown or grayish color on the electrode. If the electrode is wet, blackened, or damaged, it may need to be replaced.
- Measure the spark plug gap: Use a spark plug gap tool or feeler gauge to check the gap between the center electrode and the ground electrode. Refer to the owner’s manual for the recommended gap specification. If the gap is too large or too small, adjust it carefully using a gap tool.
- Replace the spark plug (if necessary): If the spark plug is worn, damaged, or the gap cannot be adjusted within the recommended range, it should be replaced with a new spark plug that matches the manufacturer’s specifications. Consult the owner’s manual or a local parts store to obtain the correct spark plug for your Cub Cadet lawn mower.
- Install the new or cleaned spark plug: Carefully thread the new spark plug into the spark plug hole by hand to avoid cross-threading. Once it is hand-tight, use a spark plug wrench or socket wrench to tighten it further. Be careful not to overtighten the spark plug.
- Reconnect the spark plug wire: Slide the spark plug boot back onto the spark plug until it clicks into place. Ensure it is seated firmly and there are no loose connections.
- Test the mower: With the spark plug properly installed, attempt to start the mower. If the spark plug was the cause of the starting issue, the mower should now start. If not, further troubleshooting may be necessary.
Remember to always follow safety precautions when working with spark plugs, such as wearing gloves and keeping flammable materials away from the work area.
Consult the owner’s manual for specific instructions related to your Cub Cadet lawn mower model and spark plug specifications.
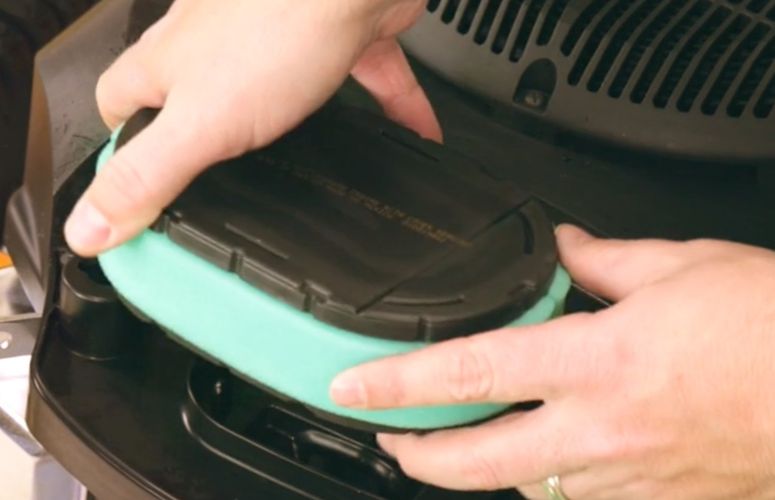
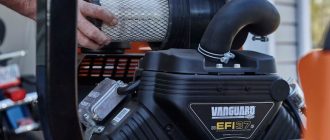
How to Check a Lawn Mower Air Filter
To check the air filter of your Cub Cadet lawn mower when it won’t start, follow these step-by-step instructions:
- Safety first: Ensure the ignition switch is in the off position and remove the key from the ignition. Allow the engine to cool down completely before proceeding.
- Locate the air filter housing: The air filter housing is typically located on the side or top of the engine. Refer to the owner’s manual for the exact location and specifications of the air filter for your Cub Cadet lawn mower model.
- Remove the air filter cover: Depending on the model, the air filter cover may have screws or clips securing it. Use the appropriate tool to remove any fasteners and carefully take off the air filter cover.
- Inspect the air filter: Take out the air filter from the housing and visually inspect its condition. Look for excessive dirt, debris, or damage. If the air filter appears clogged, dirty, or torn, it may be restricting air flow and affecting the engine’s performance.
- Clean or replace the air filter: If the air filter is dirty but still in good condition, you can clean it. Use compressed air or tap it gently against a clean surface to remove loose debris. Avoid using excessive force or water to clean the filter. If the air filter is severely dirty, damaged, or torn, it should be replaced with a new one that matches the manufacturer’s specifications.
- Check the filter housing: While the air filter is removed, inspect the inside of the filter housing for any debris or obstructions. Use a clean cloth or compressed air to remove any dirt or debris that may have accumulated.
- Reinstall the air filter: Place the cleaned or new air filter back into the housing, ensuring it fits securely. Make sure the filter is properly aligned with any tabs or guides in the housing.
- Replace the air filter cover: Position the air filter cover back onto the housing and secure it with screws or clips. Ensure that it is properly fastened and tightly sealed to prevent any debris from entering the engine.
- Test the mower: With the air filter properly installed, attempt to start the mower. If a dirty or clogged air filter was the cause of the starting issue, the mower should now start and run more smoothly. If not, further troubleshooting may be necessary.
Regularly checking and cleaning or replacing the air filter is essential for proper engine performance and longevity.
Refer to the owner’s manual for specific instructions related to your Cub Cadet lawn mower model and air filter maintenance.
How to Examine a Lawn Mower Fuel Filter
To examine the fuel filter of your Cub Cadet lawn mower when it won’t start, follow these step-by-step instructions:
- Safety first: Ensure the ignition switch is in the off position and remove the key from the ignition. Allow the engine to cool down completely before proceeding.
- Locate the fuel filter: The fuel filter is typically located along the fuel line between the fuel tank and the engine. Refer to the owner’s manual for the exact location and specifications of the fuel filter for your Cub Cadet lawn mower model.
- Position a catch container: Place a clean container or a cloth beneath the fuel filter to catch any fuel that may spill during the examination process.
- Prepare for fuel system depressurization: If your lawn mower has a fuel shutoff valve, turn it off. This will prevent fuel from flowing while you examine the fuel filter.
- Disconnect the fuel line: Use a pair of pliers or a fuel line disconnect tool to detach the fuel line from the fuel filter. Be cautious as some fuel may still be present in the line.
- Inspect the fuel filter: Take a close look at the fuel filter for any signs of dirt, debris, or clogs. Check if the filter is discolored or damaged. A clogged or dirty fuel filter can restrict fuel flow and cause starting issues.
- Clean or replace the fuel filter: If the fuel filter appears dirty but is still in good condition, you can try cleaning it. Use a solvent or fuel system cleaner recommended by the manufacturer to soak the filter and remove any built-up debris. If the filter is damaged, severely clogged, or shows signs of wear, it is best to replace it with a new one that matches the manufacturer’s specifications.
- Reconnect the fuel line: Once the fuel filter has been cleaned or replaced, reconnect the fuel line to the fuel filter. Ensure it is securely fastened and there are no leaks.
- Turn on the fuel supply: If you turned off the fuel shutoff valve earlier, turn it back on to allow fuel to flow into the fuel system.
- Test the mower: Attempt to start the lawn mower. If a clogged or dirty fuel filter was causing the starting issue, the mower should now start and run more smoothly. If not, further troubleshooting may be required.
Regularly examining and maintaining the fuel filter is important for fuel system performance and to prevent issues with starting and engine operation. Refer to the owner’s manual for specific instructions related to your Cub Cadet lawn mower model and fuel filter maintenance.
How to Inspect the Ignition System in Your Lawn Mower
To inspect the ignition system of your Cub Cadet lawn mower when it won’t start, follow these step-by-step instructions:
- Safety first: Ensure the ignition switch is in the off position and remove the key from the ignition. Allow the engine to cool down completely before proceeding.
- Locate the ignition components: The ignition system consists of several components, including the spark plug, ignition coil, spark plug wire, and ignition switch. Familiarize yourself with the location of these components on your Cub Cadet lawn mower. Refer to the owner’s manual for specific details.
- Inspect the spark plug: Start by removing the spark plug wire from the spark plug. Use a spark plug socket and ratchet to carefully remove the spark plug from the engine. Examine the spark plug for signs of wear, such as fouling, corrosion, or damage. If the spark plug appears dirty or worn out, it may need cleaning or replacement.
- Clean or replace the spark plug: If the spark plug is dirty, you can clean it using a wire brush or spark plug cleaner. Ensure the electrode gap matches the manufacturer’s specifications, and adjust it if necessary. If the spark plug is severely fouled, damaged, or worn, it is recommended to replace it with a new one that matches the manufacturer’s specifications.
- Check the spark plug wire: Inspect the spark plug wire for any visible damage, such as cracks, cuts, or corrosion. Ensure the wire is securely connected to both the spark plug and the ignition coil. If the spark plug wire is damaged, it should be replaced.
- Inspect the ignition coil: Visually inspect the ignition coil for any signs of physical damage, such as cracks or corrosion. Ensure the connections to the ignition coil are tight and secure. If the ignition coil is damaged or faulty, it may need to be replaced.
- Verify the ignition switch operation: Check the ignition switch for proper operation. Make sure it is turning on and off smoothly and that the wiring connections are secure. If the ignition switch is faulty, it may need to be repaired or replaced.
- Reinstall spark plug: Once the inspection is complete, reinsert the spark plug into the engine cylinder and tighten it using a spark plug socket and ratchet. Reconnect the spark plug wire securely.
- Test the mower: Attempt to start the lawn mower. If an issue with the ignition system was causing the starting problem, addressing the identified issues should improve the starting performance. If the problem persists, further troubleshooting or professional assistance may be necessary.
Regularly inspecting and maintaining the ignition system is crucial for proper engine operation and starting reliability. Follow the manufacturer’s guidelines and refer to the owner’s manual for specific instructions related to your Cub Cadet lawn mower model and ignition system maintenance.
How to Test & Reinstall the Carburetor in Your Lawn Mower
To test the carburetor and reinstall the carburetor bowl on your Cub Cadet lawn mower when it won’t start, follow these step-by-step instructions:
- Safety first: Ensure the ignition switch is in the off position and remove the key from the ignition. Allow the engine to cool down completely before proceeding.
- Locate the carburetor: The carburetor is typically located near the engine and is connected to the air filter and fuel line. Refer to the owner’s manual for the specific location and details of your Cub Cadet lawn mower’s carburetor.
- Inspect the carburetor: Visually examine the carburetor for any signs of damage, such as cracks, leaks, or clogs. Check the fuel inlet and outlet ports for debris or blockages. Ensure all the connections to the carburetor are secure.
- Test the fuel flow: Disconnect the fuel line from the carburetor and place a container beneath it to catch any fuel. Turn on the fuel supply or prime the fuel system (if applicable) and observe if fuel flows freely from the fuel line. If there is no fuel flow or it is restricted, check for clogs or obstructions in the fuel line or fuel filter and clean or replace as needed.
- Remove the carburetor bowl: Using a screwdriver or socket wrench, carefully remove the screws or bolts securing the carburetor bowl in place. Hold the bowl upright to prevent any remaining fuel from spilling. Inspect the bowl for sediment, dirt, or debris that may be clogging the carburetor.
- Clean the carburetor bowl: If the bowl is dirty or contains sediment, clean it thoroughly using carburetor cleaner or a suitable solvent. Use a small brush or toothbrush to remove any stubborn deposits. Ensure all the tiny holes and passages in the bowl are clear and free of debris.
- Inspect the carburetor components: With the carburetor bowl removed, inspect the float, float needle, and float bowl gasket for any signs of wear, damage, or blockage. Clean or replace any components that appear damaged or are not functioning properly.
- Reinstall the carburetor bowl: Carefully place the clean carburetor bowl back in its position. Ensure the gasket is properly aligned and seated. Tighten the screws or bolts to secure the bowl in place, but avoid over-tightening.
- Reconnect the fuel line: Reattach the fuel line to the carburetor, ensuring it is securely connected and there are no leaks.
- Test the mower: Attempt to start the lawn mower. If a carburetor issue was causing the starting problem, cleaning and reinstalling the carburetor bowl should improve the starting performance. If the problem persists, further troubleshooting or professional assistance may be necessary.
Regular maintenance and cleaning of the carburetor are essential for proper engine performance. Refer to the owner’s manual for specific instructions on carburetor maintenance, adjustments, and cleaning procedures for your Cub Cadet lawn mower model.
How to Check the Oil Level
To check the engine oil level on your Cub Cadet lawn mower when it won’t start, follow these step-by-step instructions:
- Safety first: Ensure the ignition switch is in the off position and remove the key from the ignition. Allow the engine to cool down completely before proceeding.
- Locate the oil fill cap and dipstick: The oil fill cap and dipstick are typically located on the top or side of the engine. Refer to the owner’s manual for the specific location and details of your Cub Cadet lawn mower’s oil fill cap and dipstick.
- Clean the area around the oil fill cap: Use a clean cloth or rag to wipe away any dirt or debris around the oil fill cap. This will prevent any contaminants from falling into the engine while checking the oil level.
- Remove the oil fill cap: Twist the oil fill cap counterclockwise to remove it from the engine. Set the cap aside in a clean and safe place.
- Check the oil level: Insert the dipstick into the oil fill tube and push it all the way in. Then, pull it out and observe the oil level on the dipstick. There are typically two markings on the dipstick indicating “Full” and “Add” or a range of acceptable oil levels. The oil level should be within this range or at the “Full” mark.
- Add oil if necessary: If the oil level is below the recommended range or near the “Add” mark, you need to add oil. Use the appropriate type and viscosity of oil recommended by the manufacturer. Slowly pour small amounts of oil into the oil fill tube, allowing time for the oil to settle and the level to be rechecked. Repeat this process until the oil level reaches the recommended range or the “Full” mark on the dipstick.
- Reinstall the oil fill cap: Once the oil level is correct, wipe the dipstick clean with a cloth or rag. Then, reinsert the dipstick into the oil fill tube and ensure it is fully seated. Twist the oil fill cap clockwise until it is snug and secure.
- Clean up: Wipe away any oil spills or drips from the engine or surrounding areas with a clean cloth or rag. Properly dispose of any used oil and follow local regulations for oil disposal.
Checking the engine oil level regularly is important for maintaining proper lubrication and ensuring the longevity of your lawn mower’s engine.
Refer to the owner’s manual for specific instructions on oil type, capacity, and recommended oil change intervals for your Cub Cadet lawn mower model.
How to Test a Riding Lawn Mower Safety Switch
To test a safety switch on a riding lawn mower, follow these step-by-step instructions:
- Safety first: Ensure the riding lawn mower is parked on a level surface, the engine is turned off, and the key is removed from the ignition. Engage the parking brake to prevent the mower from rolling.
- Locate the safety switches: The safety switches are typically located in different areas of the mower, such as under the seat, on the mower deck, or on the control panel. Refer to the owner’s manual for the specific location and details of the safety switches on your riding lawn mower.
- Identify the different safety switches: There are several safety switches on a riding lawn mower, including the seat switch, blade engagement switch, clutch/brake switch, and reverse switch. Each switch serves a specific safety function and may prevent the engine from starting if it is not functioning properly.
- Inspect the safety switches: Visually inspect each safety switch for any signs of damage, such as corrosion, loose connections, or worn-out components. Ensure that the switches are clean and free from debris that may affect their operation.
- Test the seat switch: Sit on the mower seat and ensure it is fully engaged. Attempt to start the engine while sitting on the seat. If the engine does not start, try slightly shifting your weight on the seat or gently bouncing to ensure the seat switch is making proper contact. If the engine starts when weight is applied to the seat, the seat switch is functioning correctly.
- Test the blade engagement switch: Engage the blade engagement lever or switch, usually located on the control panel or near the operator’s seat. Attempt to start the engine with the blade engagement switch engaged. If the engine does not start, disengage the blade engagement switch and try starting the engine again. If the engine starts when the blade engagement switch is disengaged, the switch is functioning correctly.
- Test the clutch/brake switch: Press and hold the clutch pedal or brake pedal, depending on the mower’s configuration. Attempt to start the engine while holding down the clutch or brake pedal. If the engine does not start, release the pedal and try starting the engine again. If the engine starts when the pedal is released, the clutch/brake switch is functioning correctly.
- Test the reverse switch: Engage the reverse gear or shift the mower into reverse. Attempt to start the engine while in reverse. If the engine does not start, shift the mower out of reverse and try starting the engine again. If the engine starts when not in reverse, the reverse switch is functioning correctly.
- Repair or replace faulty safety switches: If any of the safety switches fail the tests or show signs of damage, they may need to be repaired or replaced. Consult the owner’s manual or seek professional assistance to properly repair or replace the faulty safety switch.
It’s important to ensure that all safety switches on your riding lawn mower are functioning correctly to maintain safe operation. Regularly inspect and test the safety switches to identify any issues and address them promptly. Refer to the owner’s manual for specific instructions and safety switch locations for your riding lawn mower model.
Cub Cadet Lawn Mower Won’t Start FAQ
Frequently Asked Questions (FAQs) – Cub Cadet Lawn Mower Won’t Start:
Q1: Why won’t my Cub Cadet lawn mower start?
A: There can be various reasons why a Cub Cadet lawn mower won’t start, including a dead battery, fuel issues, ignition problems, clogged air filter, or malfunctioning safety switches.
Q2: How can I troubleshoot a dead battery on my Cub Cadet lawn mower?
A: To troubleshoot a dead battery, check the battery connections for corrosion or looseness. Use a multimeter to test the battery voltage. If the battery is low, charge it using an appropriate battery charger. If the battery is old or damaged, consider replacing it.
Q3: What should I do if my Cub Cadet lawn mower is not getting fuel?
A: If your lawn mower is not getting fuel, check the fuel tank for an adequate fuel level. Ensure the fuel valve is open and that the fuel line is not clogged or damaged. Inspect the fuel filter for clogs and replace it if necessary.
Q4: How can I diagnose ignition problems on my Cub Cadet lawn mower?
A: If you suspect ignition problems, check the spark plug for fouling or wear. Ensure that the spark plug wire is securely connected. Use a spark plug tester to check for spark. If there is no spark, the ignition coil or magneto may need to be replaced.
Q5: What should I do if the air filter is dirty on my Cub Cadet lawn mower?
A: A dirty air filter can restrict airflow and cause starting issues. Remove the air filter cover and inspect the air filter. If it is dirty or clogged, clean or replace it with a new one as recommended by the manufacturer.
Q6: How can I troubleshoot safety switch issues on my Cub Cadet lawn mower?
A: Safety switches are essential for proper operation. Inspect the safety switches for damage, loose connections, or misalignment. Test each safety switch according to the manufacturer’s instructions using the appropriate methods mentioned earlier.
Q7: Can a low oil level prevent my Cub Cadet lawn mower from starting?
A: Yes, some lawn mowers have safety mechanisms that prevent starting when the oil level is too low. Check the oil level using the dipstick and add oil if needed to reach the proper level.
Q8: When should I consider seeking professional assistance for my Cub Cadet lawn mower?
A: If you have followed the troubleshooting steps and your lawn mower still won’t start, or if you are unsure about performing further repairs, it is recommended to seek professional assistance from an authorized Cub Cadet service center or a qualified technician.
Remember to consult your Cub Cadet lawn mower’s owner’s manual for specific troubleshooting tips and maintenance guidelines for your model.


Can a clogged air filter prevent my Cub Cadet lawn mower from starting?
Yes, a clogged air filter can restrict the airflow to the engine and affect its starting. Inspect the air filter and clean or replace it if it appears dirty or clogged.
Can a faulty safety switch prevent my Cub Cadet lawn mower from starting?
Yes, faulty safety switches, such as the seat switch, brake switch, or blade engagement switch, can prevent the lawn mower from starting. These switches are designed to disable the engine if specific safety conditions are not met, such as someone not sitting on the seat or the parking brake not engaged.
How do I test the battery on my Cub Cadet lawn mower?
To test the battery, use a multimeter set to the DC voltage mode. Connect the positive (red) lead to the battery’s positive terminal and the negative (black) lead to the negative terminal. A fully charged battery should read around 12.6 volts. If the voltage is significantly lower, recharge or replace the battery as needed.