- Battery-Powered Lawn Mower Service Tools & Equipment
- Service Table for Battery-Powered Lawn Mower Won’t Start
- How to Check the Battery Charge & Connections
- How to Verify the Safety Switch, Wiring, and Connectors
- How to Check a Battery-Powered Lawn Mower Blade
- How to Test the Motor Controller if Lawnmower Won’t Start
- How to Examine Motor Brushes
- FAQ Section for Troubleshooting a Battery-Powered Lawn Mower
A battery-powered lawn mower can be a convenient and eco-friendly option for maintaining your lawn, but just like any other machine, it can encounter issues that prevent it from starting. If you’re facing the frustrating issue of a battery lawn mower that won’t start, you’ve come to the right place. Troubleshooting and diagnosing problems with an electric lawn mower can be a straightforward process once you understand the key components and potential issues that may arise.
In this comprehensive guide, we will provide you with expert insights and solutions to help you troubleshoot and resolve the problem of a battery lawn mower that won’t start. We’ll walk you through the process of visually inspecting the mower, checking for damaged components, examining the electrical connections, and verifying the functionality of safety switches. By recording down important details and observing visual cues, you’ll be able to pinpoint the underlying cause of the issue and take the necessary steps to address it.
Whether you’re a seasoned lawn care enthusiast or a beginner, this guide will equip you with the knowledge and expertise to troubleshoot your battery lawn mower effectively. Get ready to identify the root cause of the problem, suggest required replacements, and get your lawn mower back up and running smoothly.
Let’s dive into the troubleshooting process and get your battery lawn mower in prime working condition once again.
Battery-Powered Lawn Mower Service Tools & Equipment
When troubleshooting a battery-powered lawn mower that won’t start, you may need the following tools and equipment:
- Multimeter: This tool is used to measure electrical voltage, resistance, and continuity. It can help you diagnose issues with the battery, connections, and electrical components.
- Battery tester: A battery tester helps you determine the charge level and health of the battery. It provides a more accurate reading than simply checking the voltage.
- Battery charger: If the battery charge is low, you’ll need a battery charger to recharge it. Make sure to use a charger compatible with the battery type and follow the manufacturer’s instructions.
- Safety gloves: It’s important to wear safety gloves when working with electrical components to protect yourself from potential electrical shocks or injuries.
- Safety glasses: Safety glasses provide eye protection in case of any debris or sparks during the troubleshooting process.
- Wire brush: A wire brush can be used to clean battery terminals and remove corrosion, ensuring good electrical connections.
- Cleaning solution: You may need a mild cleaning solution, such as a mixture of baking soda and water, to clean battery terminals or other electrical connections.
- Screwdrivers: Depending on your lawn mower model, you may require various screwdrivers to remove panels, access electrical components, or check wiring connections.
- Wrenches: A set of wrenches will come in handy for tightening or loosening bolts and nuts.
- Replacement parts: If you identify any damaged or faulty components during troubleshooting, you may need to have replacement parts on hand. This can include fuses, connectors, switches, or even a new battery if necessary.
Remember to always consult the manufacturer’s instructions and safety guidelines when using tools and equipment, and take necessary precautions to ensure your safety while troubleshooting the lawn mower.
Service Table for Battery-Powered Lawn Mower Won’t Start
Here’s a service table for troubleshooting a battery lawn mower that won’t start. This table provides a step-by-step approach to help diagnose the problem and suggest potential solutions:
| Step | Service Procedure | Possible Issues | Solutions/Replacements |
|---|---|---|---|
| 1 | Check battery charge | Depleted battery | Recharge the battery or replace if necessary |
| 2 | Inspect battery connections | Loose or corroded connections | Tighten or clean connections |
| 3 | Verify safety switch functionality | Faulty or malfunctioning safety switch | Replace the safety switch if needed |
| 4 | Examine wiring and connectors | Damaged or disconnected wires | Repair or replace damaged wires or connectors |
| 5 | Check blade engagement lever | Lever not engaged properly | Adjust or fix the blade engagement lever |
| 6 | Inspect control handle | Faulty or damaged control handle | Repair or replace the control handle |
| 7 | Verify key/start button operation | Defective key or start button | Replace the key or start button if necessary |
| 8 | Examine motor brushes (if applicable) | Worn-out motor brushes | Replace the motor brushes if needed |
| 9 | Check for obstructions | Blade or motor obstructed | Remove any debris or obstructions |
| 10 | Test the motor controller | Malfunctioning motor controller | Replace the motor controller if required |
| 11 | Verify battery health | Aging or faulty battery | Replace the battery if necessary |
Please note that this service table is a general guide and the specific troubleshooting steps may vary depending on the make and model of your battery lawn mower. Always refer to the manufacturer’s manual or consult a professional if you are unsure about any steps or require further assistance. Remember to prioritize safety when working with electrical components and always disconnect the battery before performing any inspections or repairs.
How to Check the Battery Charge & Connections
Here is a step-by-step instruction on how to check the battery charge and connections if your battery-powered lawn mower won’t start:
- Safety first: Ensure the lawn mower is turned off and remove the key, if applicable. Wear protective gloves and safety glasses for added protection.
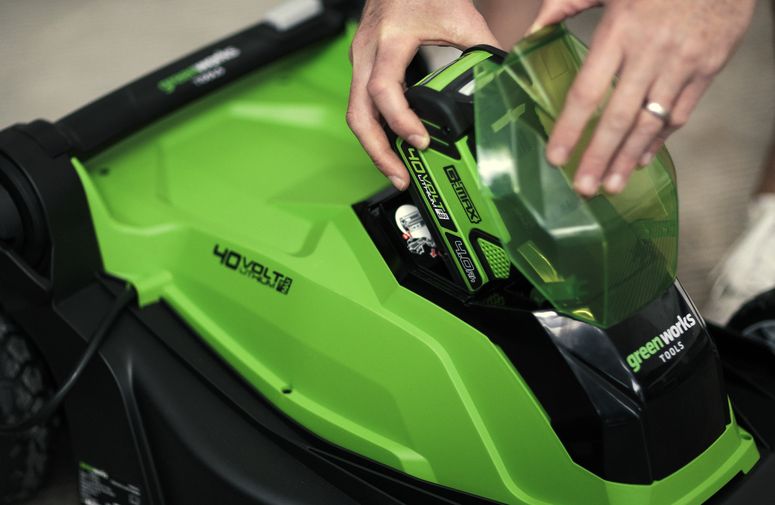
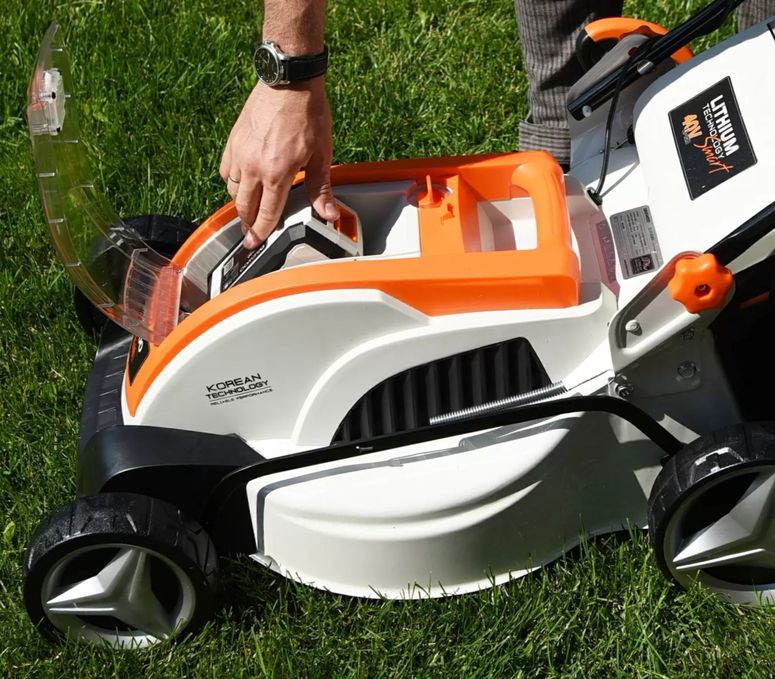
- Locate the battery: Identify the battery compartment on your lawn mower. It is typically located either under the seat or at the rear of the mower.
- Check battery charge: Using a multimeter or battery tester, check the charge level of the battery. Set the multimeter to the DC voltage setting and place the red probe on the positive terminal and the black probe on the negative terminal. A fully charged battery should read around 12.6 to 12.8 volts. If the voltage is significantly lower, the battery may need to be recharged or replaced.
- Inspect battery connections: Ensure that the battery terminals are clean and free from corrosion. If there is corrosion, use a wire brush or a battery terminal cleaner to remove it. Clean both the battery terminals and the corresponding cable connectors thoroughly.
- Check cable connections: Follow the battery cables from the terminals to where they connect to the mower’s electrical system. Make sure the cable connections are secure and tight. If any connections are loose, use a wrench or pliers to tighten them.
- Test the battery voltage under load: If the battery charge appears to be sufficient, perform a load test to check its performance under a load. Connect the multimeter to the battery terminals as before, and then attempt to start the lawn mower. Observe the voltage reading on the multimeter while attempting to start the mower. If the voltage drops significantly below 10.5 volts or if the battery cannot sustain the load, it may need to be recharged or replaced.
- Recharge or replace the battery: If the battery charge is low, recharge it following the manufacturer’s instructions. If the battery is old or cannot hold a charge, it may need to be replaced with a new one. Refer to the manufacturer’s recommendations for the correct battery specifications.
- Reconnect the battery: Once the battery is fully charged or replaced, reconnect the cables to the appropriate terminals. Ensure the positive cable is connected to the positive terminal (+) and the negative cable to the negative terminal (-).
- Test the mower: Turn on the lawn mower and attempt to start it. If the battery charge and connections were the cause of the issue, the mower should now start properly.
By following these steps, you can effectively check the battery charge and connections of your battery-powered lawn mower, helping to diagnose and resolve the issue if the mower won’t start. Remember to always refer to the manufacturer’s manual for specific instructions related to your mower model.
How to Verify the Safety Switch, Wiring, and Connectors
Here is a step-by-step instruction on how to verify the safety switch, wiring, and connectors if your battery-powered lawn mower won’t start:
- Safety first: Ensure the lawn mower is turned off and remove the key, if applicable. Wear protective gloves and safety glasses for added protection.
- Locate the safety switch: The safety switch is typically located near the seat or the handlebar of the lawn mower. It is designed to prevent the mower from starting if certain conditions are not met.
- Inspect the safety switch: Visually inspect the safety switch for any signs of damage, such as loose wires, broken components, or corrosion. Ensure that the switch is properly engaged when the seat or handlebar is in the correct position.
- Check wiring and connectors: Follow the wiring harness from the safety switch to other components of the mower, such as the ignition switch or the electric motor. Inspect the wiring and connectors for any signs of damage, fraying, loose connections, or corrosion. If any issues are found, repair or replace the damaged wiring or connectors.
- Test the safety switch: Depending on the design of your lawn mower, there may be different types of safety switches, such as seat switches or handlebar switches. Test the functionality of the safety switch by engaging or disengaging it while attempting to start the mower. Listen for any clicking sounds or check for changes in the mower’s response. If the mower starts or reacts differently when the safety switch is manipulated, it may indicate a faulty switch that needs to be replaced.
- Inspect other wiring and connectors: While you’re checking the wiring and connectors, take the opportunity to inspect other areas of the mower where wiring is present, such as the battery connections, motor connections, or control panel. Look for any loose connections, damaged wires, or corrosion. Repair or replace any faulty components as necessary.
- Reconnect and secure all wiring: After inspecting and verifying the safety switch, wiring, and connectors, ensure that all connections are securely fastened. Double-check that all wires are properly connected and that there are no loose ends or exposed wires that could cause electrical issues.
- Test the mower: Turn on the lawn mower and attempt to start it. If the safety switch, wiring, and connectors were the cause of the issue, the mower should now start properly.
By following these steps, you can effectively verify the safety switch, wiring, and connectors of your battery-powered lawn mower, helping to diagnose and resolve the issue if the mower won’t start.
Remember to always refer to the manufacturer’s manual for specific instructions related to your mower model.
How to Check a Battery-Powered Lawn Mower Blade
Here is a step-by-step instruction on how to inspect the blade if your battery-powered lawn mower won’t start:
- Safety first: Ensure the lawn mower is turned off and remove the key or disconnect the battery to prevent accidental starts. Wear protective gloves and safety glasses for added protection.
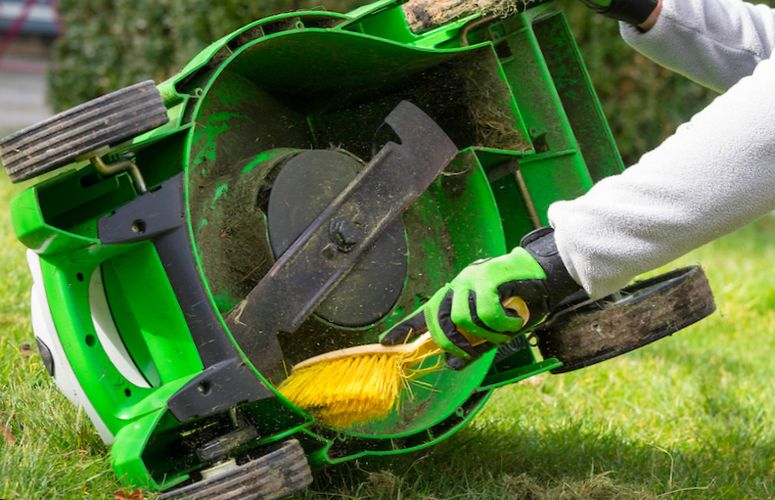
- Locate the blade: The blade is located underneath the mower deck and is responsible for cutting the grass. Depending on your mower model, you may need to tilt the mower or remove a protective cover to access the blade.
- Visually inspect the blade: Carefully examine the blade for any signs of damage, such as cracks, bends, or excessive wear. Look for any debris, such as grass clippings or twigs, that may be stuck around the blade or underneath the mower deck.
- Check for blade balance: Hold the blade at the center mounting hole and check if it hangs level. If the blade tilts to one side, it may indicate an imbalance, which can affect the mower’s performance and cause it to stall or not start.
- Clean the blade and mower deck: If there is debris stuck around the blade or underneath the mower deck, use a brush or a scraper to remove it. Ensure that the area is clear and free from any obstructions that could hinder the blade’s rotation.
- Check blade sharpness: A dull blade can strain the mower’s motor and reduce cutting performance. If the blade appears dull or has nicks and dents, it may need to be sharpened or replaced. Follow the manufacturer’s instructions for sharpening or replacing the blade.
- Inspect the blade mounting hardware: Examine the blade mounting bolt or nut to ensure it is secure and tightened properly. Loose or damaged mounting hardware can affect the blade’s rotation and cause issues with starting the mower.
- Reassemble and test the mower: Once you have inspected the blade and addressed any necessary repairs or maintenance, reassemble any removed parts or covers. Reconnect the battery or insert the key, and then test the mower to see if it starts and runs properly.
By following these steps, you can inspect the blade of your battery-powered lawn mower and identify any issues that may be causing it not to start.
Regular blade maintenance, including cleaning, sharpening, and checking for balance, is important for optimal mower performance. Remember to always refer to the manufacturer’s manual for specific instructions related to your mower model.
How to Test the Motor Controller if Lawnmower Won’t Start
Here is a step-by-step instruction on how to test the motor controller if your battery-powered lawn mower won’t start:
- Safety first: Ensure the lawn mower is turned off and remove the key or disconnect the battery to prevent accidental starts. Wear protective gloves and safety glasses for added protection.
- Locate the motor controller: The motor controller is typically housed inside the main control panel or battery compartment of the lawn mower. Refer to the manufacturer’s manual for the specific location of the motor controller.
- Inspect the motor controller: Carefully examine the motor controller for any visible signs of damage, such as burnt components, loose connections, or corrosion. Ensure that all wires and connectors are securely attached and free from damage.
- Test the power supply: Use a multimeter set to the appropriate voltage range to test the power supply to the motor controller. Place the multimeter probes on the positive and negative terminals of the controller to check if there is an adequate power supply. Refer to the manufacturer’s manual for the recommended voltage range.
- Check for error codes: Some battery-powered lawn mowers are equipped with diagnostic systems that display error codes when there is a problem with the motor controller. Check the manufacturer’s manual or control panel display for any error codes and refer to the corresponding troubleshooting guide.
- Test the controller’s functionality: If there are no visible signs of damage and the power supply is within the correct range, you can perform functional tests on the motor controller. This may involve using a diagnostic tool provided by the manufacturer or following specific instructions outlined in the manual.
- Consult the manufacturer or a professional: If you are unable to determine the cause of the problem or if the motor controller tests indicate a malfunction, it is recommended to contact the manufacturer’s customer support or consult a professional technician who specializes in battery-powered lawn mowers.
- Follow manufacturer’s recommendations: If a fault is detected in the motor controller, follow the manufacturer’s recommendations for repair or replacement. They may provide guidance on troubleshooting further or suggest contacting an authorized service center for assistance.
By following these steps, you can test the motor controller of your battery-powered lawn mower to identify any issues that may be causing it not to start.
Proper diagnosis and repair of the motor controller can help resolve starting problems and ensure the smooth operation of your mower. Always refer to the manufacturer’s manual for specific instructions and safety guidelines related to your mower model.
How to Examine Motor Brushes
Here is a step-by-step instruction on how to examine motor brushes if your battery-powered lawn mower won’t start:
- Safety first: Ensure the lawn mower is turned off and remove the key or disconnect the battery to prevent accidental starts. Wear protective gloves and safety glasses for added protection.
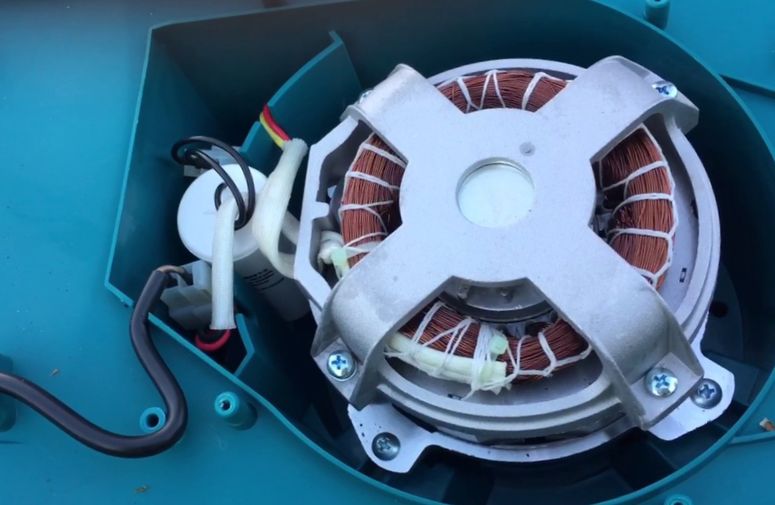
- Locate the motor brushes: The motor brushes are small carbon blocks or rods that make contact with the motor’s armature. They are typically located on either side of the motor housing.
- Access the motor brushes: Depending on your lawn mower model, you may need to remove a protective cover or access panel to reach the motor brushes. Refer to the manufacturer’s manual for specific instructions on how to access the brushes.
- Inspect the motor brushes: Carefully examine the motor brushes for any signs of wear or damage. Look for excessive wear, such as brushes that have become significantly shorter than when new, or brushes that have worn down to the metal contact plate.
- Clean the motor brushes: If the motor brushes appear dirty or coated with debris, use a small brush or compressed air to gently clean them. Ensure that the brushes are free from any dust, dirt, or other contaminants that could affect their performance.
- Measure the brush length: Using a ruler or caliper, measure the length of the motor brushes. Compare the measurements to the manufacturer’s specifications to determine if the brushes are within the acceptable range. If they are significantly shorter than the recommended length, they may need to be replaced.
- Check brush spring tension: Examine the tension of the brush springs. The springs should provide firm but not excessive pressure against the motor’s armature. If the springs appear loose or damaged, they may need to be replaced.
- Replace worn or damaged brushes: If the motor brushes are worn down to an extent that affects their performance or if they show signs of damage, they should be replaced. Refer to the manufacturer’s manual for the correct replacement brushes and follow the instructions for proper installation.
- Reassemble and test the mower: Once you have examined and, if necessary, replaced the motor brushes, reassemble any removed parts or covers. Reconnect the battery or insert the key, and then test the mower to see if it starts and runs properly.
By following these steps, you can examine the motor brushes of your battery-powered lawn mower and identify any issues that may be causing it not to start.
Proper maintenance and replacement of motor brushes when necessary can help ensure optimal performance and prolong the life of your mower’s motor. Remember to always refer to the manufacturer’s manual for specific instructions related to your mower model.
FAQ Section for Troubleshooting a Battery-Powered Lawn Mower
Here’s an FAQ section for troubleshooting a battery-powered lawn mower that won’t start:
Q: Why is my battery-powered lawn mower not starting?
A: There can be several reasons for this issue, such as a low battery charge, faulty connections, damaged components, safety switch problems, or issues with the motor controller.
Q: How do I know if the battery is the problem?
A: Check the battery charge level using a battery tester or multimeter. If the charge is low, recharge the battery. If the battery fails to hold a charge or shows signs of damage, it may need replacement.
Q: What should I do if the battery connections are loose or corroded?
A: Ensure that the battery connections are securely tightened. Clean any corrosion using a battery terminal cleaner or a mixture of baking soda and water. Rinse with clean water and dry thoroughly before reconnecting.
Q: What should I check if the safety switch is causing the issue?
A: Inspect the safety switch for any damage or misalignment. Make sure it is engaging properly when the necessary conditions are met. Replace the safety switch if it is faulty.
Q: How can I identify damaged components?
A: Conduct a visual inspection of all components, such as wires, connectors, and fuses. Look for signs of wear, fraying, or melting. Damaged components may need to be replaced.
Q: What steps can I take to troubleshoot the motor controller?
A: Inspect the motor controller for any visible damage or loose connections. Test the power supply to the controller using a multimeter. Follow the manufacturer’s instructions for any specific diagnostic tests or error codes.
Q: What if I am unable to identify or fix the problem?
A: If you’re unsure or unable to resolve the issue, it is recommended to contact the manufacturer’s customer support or consult a professional technician who specializes in battery-powered lawn mowers.
Remember to always follow the manufacturer’s instructions and safety guidelines when troubleshooting or repairing your battery-powered lawn mower.


What are some downsides of battery-powered lawn mowers?
Gas-powered equipment can be a real pain, what with all the fiddling, the smell, and the noise. But here’s the thing: I’ve seen too many battery tools being sold online with the same old story – “used only a few times, needs a new battery.” And let me tell you, finding a replacement battery for these babies can be a real headache. They often have some fancy, unique design that costs a pretty penny, almost as much as the original tool itself. And since there are so many different configurations out there, finding knockoff options is like searching for a needle in a haystack. Heck, I wouldn’t be surprised if these one-of-a-kind battery packs become completely unavailable in just a few years. And worst of all, there’s no way for the user or a repair shop to fix the battery safely.
Now, I get it, gas engines can be finicky. But the beauty of it is that most issues can be fixed with some cheap, commonly available parts, usually costing under 50 bucks. You or a repair shop can keep a gas-powered tool running smoothly for years, and you get to decide when it’s time to retire it. Plus, there are plenty of affordable options in the used market.
So, if you’re considering an electric mower, pay close attention to the battery system. How long has it been on the market? How many other tools use the same battery? What’s the cost of getting a replacement? Can you find knockoffs if needed? A good ecosystem of batteries and tools can significantly reduce your risk down the line.