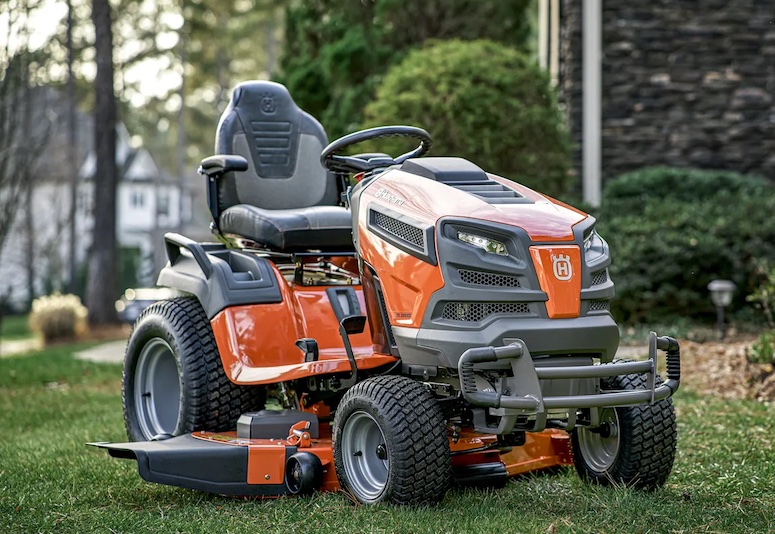
- Riding Lawn Mower Service Tools & Equipment
- Service Table for Husqvarna Lawn Mower Won’t Start
- How to Check the Battery
- How to Check the Spark Plug
- How to Check the Air Filter
- How to Examine the Fuel Filter
- How to Inspect the Ignition System
- How to Test the Carburetor
- How to Check the Oil Level
- How to Check the Safety Switch
- Husqvarna Lawn Mower Won’t Start F.A.Q.
Having trouble starting your Husqvarna lawn mower? Don’t worry, I’m here to help! When your Husqvarna lawn mower won’t start, it can be frustrating, but there are several troubleshooting steps you can take to identify and resolve the issue.
From visually inspecting the engine and carburetor parts to checking fuel and power-related components, we’ll guide you through the process of diagnosing and addressing the problem.
By following these troubleshooting solutions, you’ll be on your way to getting your Husqvarna lawn mower up and running again in no time. So let’s get started and find out what’s causing the problem so that we can get your lawn mower back to peak performance.
Riding Lawn Mower Service Tools & Equipment
When troubleshooting a Husqvarna riding lawn mower that won’t start, it’s helpful to have the following tools and equipment on hand:
- Socket set: A set of sockets and a ratchet will be useful for removing and reinstalling various components.
- Screwdrivers: Both flathead and Phillips screwdrivers will be needed to remove screws and access different parts of the mower.
- Spark plug wrench: This specialized wrench is designed to remove and install the spark plug.
- Multimeter: A multimeter is an essential tool for testing electrical connections, checking for voltage, and diagnosing electrical issues.
- Fuel line clamp: This clamp is used to block the fuel flow when removing or inspecting the fuel line.
- Fuel pressure gauge: If you suspect a fuel delivery issue, a fuel pressure gauge can help you test the fuel system’s pressure.
- Oil dipstick: A dipstick is used to check the oil level in the engine. Make sure you have the appropriate dipstick for your Husqvarna model.
- Safety glasses and gloves: Always prioritize safety when working on your lawn mower. Wear safety glasses to protect your eyes and gloves to keep your hands safe.
- Cleaning tools: It’s helpful to have a wire brush or a small brush for cleaning spark plugs, connectors, and other parts.
- Owner’s manual: The owner’s manual for your Husqvarna lawn mower is an invaluable resource. It contains specific information about your model, including troubleshooting tips and maintenance procedures.
Having these tools and equipment readily available will make it easier for you to diagnose and resolve issues with your Husqvarna riding lawn mower. Remember to refer to your owner’s manual for specific guidance and safety precautions for your particular model.
Service Table for Husqvarna Lawn Mower Won’t Start
If you’re experiencing issues with your Husqvarna lawn mower not starting, I can provide you with troubleshooting solutions to help diagnose and address the problem. It’s important to visually inspect the various components and engine parts to identify potential issues and determine the appropriate course of action. Here are some step-by-step instructions to get you started:
Step 1: Check the Fuel Level
- Ensure that there is an adequate amount of fuel in the lawn mower’s fuel tank.
- If the fuel level is low, refill it with fresh gasoline. Avoid using stale or old fuel.
Step 2: Verify the Battery (if applicable)
- If your Husqvarna lawn mower is equipped with a battery, inspect the battery terminals for corrosion or loose connections.
- Check the battery voltage using a multimeter. It should be within the specified range.
- Charge the battery if it is low or replace it if necessary.
Step 3: Verify the Fuel System
- Inspect the fuel lines and filter for any signs of damage, clogs, or leaks.
- Clean or replace the fuel filter if necessary.
- Ensure that the fuel lines are properly connected.
Step 4: Examine the Air Filter
- Remove the air filter cover and inspect the air filter for dirt, debris, or damage.
- If the air filter is dirty or clogged, clean or replace it following the manufacturer’s instructions.
- Ensure that the air filter is properly installed.
Step 5: Check the Spark Plug
- Locate the spark plug, typically located near the engine’s cylinder head.
- Remove the spark plug wire and unscrew the spark plug using a spark plug wrench.
- Inspect the spark plug for signs of wear, fouling, or damage.
- Clean or replace the spark plug as needed, ensuring the correct gap setting.
- Reinstall the spark plug and reconnect the spark plug wire.
Step 6: Verify the Ignition System
- Inspect the ignition switch and wiring connections for any loose or damaged components.
- Check the ignition coil for proper connection and signs of damage.
- Ensure that the kill switch or safety features are properly engaged or disengaged.
Step 7: Check the Engine Oil Level
- Locate the engine oil dipstick, typically located near the engine.
- Remove the dipstick, wipe it clean, and reinsert it fully.
- Remove the dipstick again and check the oil level. Ensure it is within the recommended range.
- If the oil level is low, add the appropriate type and amount of oil.
Step 8: Inspect Safety Features
- Ensure that all safety switches, such as the blade engagement switch or seat switch, are functioning properly.
- Check for any loose or damaged wiring connections related to safety switches.
If after following these steps your Husqvarna lawn mower still won’t start, it may be necessary to consult a professional technician or contact Husqvarna’s customer support for further assistance. They can provide more specific guidance based on your mower’s model and configuration.
How to Check the Battery
To check the battery of your Husqvarna lawn mower if it won’t start, follow these step-by-step instructions:
- Ensure Safety: Before starting any inspection or maintenance work, make sure the lawn mower is turned off and the ignition key is removed. This will prevent accidental starts and ensure your safety.
- Locate the Battery: The battery is typically located under the seat or in a compartment near the engine. Refer to your owner’s manual for the exact location of the battery on your specific Husqvarna model.
- Inspect Battery Connections: Visually inspect the battery terminals and cables for any signs of corrosion, loose connections, or damage. Corrosion appears as a white or greenish powdery substance on the terminals. If you notice corrosion, proceed to clean the terminals.
- Clean the Battery Terminals: If there is corrosion on the battery terminals, mix a solution of baking soda and water. Apply this solution to the terminals and use a wire brush to scrub away the corrosion. Rinse the terminals with clean water and dry them thoroughly.
- Check Battery Voltage: Using a multimeter set to the DC voltage mode, connect the positive (red) probe to the positive terminal of the battery and the negative (black) probe to the negative terminal. Check the voltage reading on the multimeter display. A fully charged battery should read around 12.6 volts or higher. If the voltage is significantly lower, it may indicate a weak or discharged battery.
- Charge or Replace the Battery: If the battery voltage is low, you can try charging it using an appropriate battery charger. Follow the instructions provided with the charger to safely charge the battery. If the battery fails to hold a charge or is several years old, it may need replacement. Consider replacing the battery with a new one.
- Reconnect the Battery: Once the battery is fully charged or replaced, reconnect the battery cables to their respective terminals. Ensure that the positive cable is connected to the positive terminal (+) and the negative cable to the negative terminal (-).
- Test the Mower: With the battery properly connected, attempt to start the Husqvarna lawn mower. If the engine starts, the battery was likely the issue. If the mower still doesn’t start, proceed with additional troubleshooting steps or consult a professional for further assistance.
Regular maintenance of the battery, such as cleaning the terminals and ensuring proper charging, can help prevent starting issues with your Husqvarna lawn mower.
Refer to your owner’s manual for specific instructions and safety precautions related to your model.
How to Check the Spark Plug
To inspect the spark plug of your Husqvarna lawn mower if it won’t start, follow these step-by-step instructions:
- Ensure Safety: Before beginning any inspection or maintenance work, ensure that the lawn mower is turned off and the ignition key is removed. This will prevent accidental starts and ensure your safety.
- Locate the Spark Plug: The spark plug is typically located on the engine, either on the top or side. Refer to your owner’s manual for the exact location of the spark plug on your specific Husqvarna model.
- Remove the Spark Plug: Using a spark plug socket and a ratchet or spark plug wrench, carefully loosen and remove the spark plug. Turn it counterclockwise until it is fully removed from the engine.
- Inspect the Spark Plug: Examine the spark plug for signs of wear, damage, or fouling. Check for the following:
- Fouling: If the spark plug tip is covered in carbon deposits or oil residue, it may be fouled. This can occur due to improper fuel mixture, worn piston rings, or other engine issues.
- Electrode Condition: Inspect the electrode (the small metal piece at the end of the spark plug) for wear or damage. It should have a clean, sharp edge. If the electrode is eroded or rounded, the spark plug may need replacement.
- Gap: Check the gap between the center electrode and the ground electrode using a spark plug gap tool. Refer to your owner’s manual for the correct gap specification. If the gap is too wide or too narrow, it may affect the spark plug’s performance.
- Clean or Replace the Spark Plug: If the spark plug is fouled with carbon deposits or oil, you can try cleaning it using a wire brush or spark plug cleaner. Gently scrub the electrode and insulator to remove any deposits. If the spark plug is severely fouled, damaged, or has an excessively worn electrode, it is recommended to replace it with a new one. Refer to your owner’s manual for the appropriate spark plug type and specifications.
- Gap the New Spark Plug: If you’re installing a new spark plug, ensure that the gap matches the manufacturer’s specifications. Use a spark plug gap tool to adjust the gap as needed. Be careful not to bend or damage the electrodes during this process.
- Reinstall the Spark Plug: Carefully thread the spark plug back into the engine by hand, turning it clockwise. Once it is finger-tight, use the spark plug socket and ratchet or spark plug wrench to tighten it further. Avoid overtightening, as it can damage the spark plug or the engine.
- Test the Mower: With the spark plug properly installed, attempt to start the Husqvarna lawn mower. If the engine starts and runs smoothly, the spark plug was likely the issue. If the mower still doesn’t start or runs poorly, proceed with additional troubleshooting steps or consult a professional for further assistance.
Regular inspection and maintenance of the spark plug can help ensure proper ignition and engine performance in your Husqvarna lawn mower.
Always refer to your owner’s manual for specific instructions and safety precautions related to your model.
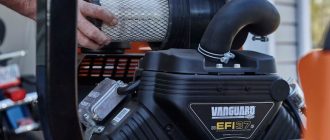
How to Check the Air Filter
To check the air filter of your Husqvarna lawn mower if it won’t start, follow these step-by-step instructions:
- Ensure Safety: Before performing any maintenance, make sure the lawn mower is turned off, the ignition key is removed, and the engine is cool. This will prevent accidental starts and ensure your safety.
- Locate the Air Filter: The air filter is usually housed in a plastic or metal box near the engine. Refer to your owner’s manual to find the exact location of the air filter on your specific Husqvarna model.
- Remove the Air Filter Cover: Use a screwdriver or a socket wrench (depending on the type of fasteners used) to remove the screws or bolts securing the air filter cover. Set aside the fasteners in a safe place.
- Remove the Air Filter: Lift off the air filter cover to expose the air filter. Carefully remove the air filter from its housing. It may be attached with clips or held in place by a retaining nut. Take note of how the air filter is positioned for reassembly.
- Inspect the Air Filter: Examine the air filter for any signs of dirt, debris, or damage. Check for the following:
- Dirt and Debris: If the air filter is clogged with dirt, grass clippings, or other debris, it may restrict the airflow to the engine. A dirty air filter can cause starting problems or affect engine performance.
- Damage: Look for any tears, holes, or damage to the filter material. A damaged air filter may allow contaminants to enter the engine, which can lead to poor performance or engine damage.
- Clean or Replace the Air Filter: If the air filter is dirty but still in good condition, you can try cleaning it. Gently tap the filter on a clean surface to remove loose debris. If it is heavily clogged, use compressed air or a soft brush to carefully remove the dirt and debris. Do not use water or liquid cleaners, as they can damage the filter.If the air filter is damaged, excessively dirty, or cannot be effectively cleaned, it should be replaced with a new one. Refer to your owner’s manual or the recommended maintenance schedule for the correct replacement filter part number.
- Reinstall the Air Filter: Once the air filter is cleaned or replaced, carefully place it back into its housing. Ensure it is properly seated and secured in place.
- Reinstall the Air Filter Cover: Align the air filter cover with the corresponding slots or mounting points on the engine. Reinsert the screws or bolts and tighten them securely but not excessively. Ensure the cover is properly aligned and sealed to prevent debris from entering the air intake.
- Test the Mower: Attempt to start the Husqvarna lawn mower and observe if it starts and runs smoothly. A clean or new air filter should help improve the engine’s performance and starting ability.
Regular inspection and maintenance of the air filter is crucial to keep your Husqvarna lawn mower running efficiently.
Follow the recommended maintenance schedule outlined in your owner’s manual for air filter cleaning or replacement intervals.
How to Examine the Fuel Filter
To examine the fuel filter of your Husqvarna lawn mower if it won’t start, follow these step-by-step instructions:
- Ensure Safety: Before starting any maintenance, ensure that the lawn mower is turned off, the ignition key is removed, and the engine is cool. This will prevent accidental starts and ensure your safety.
- Locate the Fuel Filter: The fuel filter is typically located along the fuel line, between the fuel tank and the carburetor. Consult your Husqvarna lawn mower’s owner’s manual to find the precise location of the fuel filter on your specific model.
- Identify the Fuel Filter: Look for a small cylindrical or rectangular-shaped component in the fuel line. The fuel filter may be made of plastic or metal, and it may have arrow markings indicating the direction of fuel flow.
- Prepare for Inspection: Place a clean rag or towel beneath the fuel filter to catch any fuel that may spill during the examination process.
- Disconnect the Fuel Line: If necessary, use pliers or a fuel line clamp to pinch the fuel line on both sides of the fuel filter to prevent fuel from leaking out. Gently disconnect the fuel line from both ends of the fuel filter. Take note of which end of the fuel filter connects to the fuel tank and which end connects to the carburetor.
- Inspect the Fuel Filter: Examine the fuel filter for any signs of dirt, debris, or clogging. Look for the following:
- Dirt and Debris: If the fuel filter is clogged with dirt, sediment, or debris, it may restrict the flow of fuel to the engine, leading to starting issues or poor performance.
- Damage: Check for any cracks, breaks, or damage to the fuel filter housing. A damaged fuel filter should be replaced.
- Clean or Replace the Fuel Filter: If the fuel filter is only slightly dirty, it may be possible to clean it. Use a clean cloth or a small brush to gently remove any visible dirt or debris. Alternatively, if the fuel filter is heavily clogged or damaged, it is recommended to replace it with a new one.Ensure that you have the correct replacement fuel filter designed for your Husqvarna lawn mower model. Refer to your owner’s manual or consult a Husqvarna authorized dealer for the appropriate part number.
- Reinstall the Fuel Filter: Connect the fuel line to the appropriate ends of the fuel filter, ensuring a secure connection. Double-check that the fuel line is correctly attached to the fuel tank and the carburetor.
- Test the Mower: Attempt to start the Husqvarna lawn mower and observe if it starts and runs smoothly. A clean or new fuel filter should help ensure proper fuel flow to the engine and improve its performance.
Regular inspection and maintenance of the fuel filter are essential for the smooth operation of your Husqvarna lawn mower.
Consider following the recommended maintenance schedule outlined in your owner’s manual to clean or replace the fuel filter at the appropriate intervals.
How to Inspect the Ignition System
To inspect the ignition system of your Husqvarna lawn mower if it won’t start, follow these step-by-step instructions:
- Ensure Safety: Before starting any maintenance, make sure the lawn mower is turned off, the ignition key is removed, and the engine is cool. This will prevent accidental starts and ensure your safety.
- Locate the Ignition System Components: The ignition system consists of several components, including the spark plug, ignition coil, and spark plug wire. Consult your Husqvarna lawn mower’s owner’s manual to locate these components on your specific model.
- Check the Spark Plug: Start by inspecting the spark plug, which is responsible for igniting the fuel-air mixture in the engine. Follow these sub-steps:
a. Remove the Spark Plug: Use a spark plug socket wrench to carefully remove the spark plug from the engine cylinder head. Pay attention to any dirt or debris around the spark plug area.
b. Inspect the Spark Plug: Examine the spark plug for any signs of damage, such as fouling, excessive wear, or corrosion. Look for the following:
– Fouling: If the spark plug is covered in carbon deposits or oil, it may not spark effectively. Clean or replace the spark plug as necessary.
– Excessive Wear: Check the electrode tip for signs of erosion or excessive wear. If the electrode is worn down, it may not produce a strong spark. Replace the spark plug if needed.
– Corrosion: Inspect the spark plug for any corrosion on the metal parts. Corrosion can hinder the flow of electricity and lead to starting issues. Clean or replace the spark plug if corrosion is present.
c. Check the Spark Plug Gap: Using a spark plug gap tool, ensure that the spark plug gap matches the specifications provided in your owner’s manual. Adjust the gap by gently bending the electrode if necessary. - Inspect the Ignition Coil: The ignition coil is responsible for generating the electrical charge that powers the spark plug. Follow these sub-steps:
a. Locate the Ignition Coil: Find the ignition coil, which is usually connected to the spark plug wire and positioned near the flywheel or engine.
b. Check the Wiring: Inspect the ignition coil wiring for any visible damage, such as fraying or loose connections. Ensure that all connections are secure and free of corrosion. If any issues are found, repair or replace the wiring as necessary.
c. Test the Ignition Coil: To test the ignition coil, you will need an ignition coil tester or a multimeter. Follow the instructions provided with the tester or refer to your owner’s manual for the specific testing procedure. This will help determine if the ignition coil is functioning properly. If the ignition coil fails the test, it should be replaced. - Check the Spark Plug Wire: Examine the spark plug wire, which connects the ignition coil to the spark plug. Look for any visible damage, such as cracks, cuts, or worn insulation. Ensure that the wire is securely connected to both the ignition coil and the spark plug. Replace the spark plug wire if any damage is found.
- Reinstall the Spark Plug: Once you have finished inspecting the ignition system components, reinstall the spark plug into the engine cylinder head. Use a spark plug socket wrench to tighten it securely, but avoid overtightening.
- Test the Mower: Attempt to start the Husqvarna lawn mower and observe if it starts and runs smoothly. A properly functioning ignition system should provide a strong spark to ignite the fuel-air mixture and allow the engine to start.
Regular inspection and maintenance of the ignition system are crucial for the optimal performance of your Husqvarna lawn mower. Consider following the recommended maintenance schedule outlined in your owner’s manual to clean or replace the spark plug, ignition coil, and spark plug wire at the appropriate intervals.
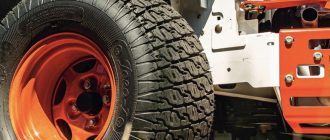
How to Test the Carburetor
To test the carburetor of your Husqvarna lawn mower if it won’t start, follow these step-by-step instructions:
- Safety First: Ensure that the lawn mower is turned off, the ignition key is removed, and the engine is cool before starting any maintenance. This will prevent accidental starts and ensure your safety.
- Locate the Carburetor: The carburetor is usually located on the side or top of the engine, and it is responsible for mixing fuel and air to provide the engine with the proper fuel-air ratio.
- Inspect the Carburetor Exterior: Visually inspect the carburetor for any signs of damage, such as cracks, leaks, or loose connections. Check the fuel lines and fittings connected to the carburetor for any visible issues. If you notice any damage, repair or replace the carburetor or affected parts accordingly.
- Check the Fuel Supply: Ensure that there is an adequate supply of fuel reaching the carburetor. Check the fuel tank to ensure it has enough fuel and that the fuel valve is open if applicable. If the fuel level is low, fill the tank with fresh gasoline.
- Remove and Clean the Carburetor: If the carburetor appears to be dirty or clogged, it may need to be cleaned. Follow these sub-steps:
a. Remove the Air Filter: Before accessing the carburetor, remove the air filter cover and remove the air filter. This will allow easier access to the carburetor.
b. Remove the Carburetor: Depending on your model, you may need to disconnect the fuel line, throttle linkage, and other connections to remove the carburetor from the engine. Consult your owner’s manual for specific instructions on carburetor removal.
c. Disassemble the Carburetor: Once the carburetor is removed, disassemble it carefully, noting the position of each part for reassembly. Use a carburetor cleaner to clean the various components, including the float, jets, and passages. Ensure that all passages are clear of debris.
d. Inspect and Replace Worn Parts: While inspecting the carburetor components, check for any signs of wear or damage. Pay attention to the gaskets, O-rings, and diaphragms. If any parts are worn or damaged, replace them with new ones. e. Reassemble and Reinstall the Carburetor: Once the carburetor is clean and all necessary parts are replaced, reassemble the carburetor in the reverse order of disassembly. Make sure all connections are secure and the carburetor is properly aligned. - Adjust the Carburetor Settings: Depending on your Husqvarna lawn mower model, there may be specific carburetor adjustment settings. Consult your owner’s manual for the recommended settings and adjust the idle speed and mixture screws accordingly. Use a screwdriver to make these adjustments.
- Test the Mower: After cleaning and reinstalling the carburetor, attempt to start the lawn mower. Observe if it starts easily and runs smoothly. Proper carburetor function should ensure a consistent fuel-air mixture for optimal engine performance.
Regular maintenance of the carburetor, including cleaning and adjustment, is important to keep your Husqvarna lawn mower running smoothly. Refer to your owner’s manual for the recommended maintenance schedule and follow it accordingly.
How to Check the Oil Level
To check the engine oil level of your Husqvarna lawn mower if it won’t start, follow these step-by-step instructions:
- Safety First: Ensure that the lawn mower is turned off, the ignition key is removed, and the engine is cool before starting any maintenance. This will prevent accidental starts and ensure your safety.
- Locate the Oil Fill Cap/Dipstick: The oil fill cap/dipstick is usually located on the side or top of the engine. It may be marked with a label or have a dipstick attached to it.
- Remove the Oil Fill Cap/Dipstick: Twist and remove the oil fill cap or pull out the dipstick to access the oil reservoir.
- Wipe the Dipstick/Cap: Use a clean cloth or paper towel to wipe off any oil residue from the dipstick or inside the cap.
- Insert and Remove the Dipstick/Cap: Insert the dipstick fully into the oil reservoir, or reattach the oil fill cap and tighten it securely. Then, remove the dipstick or cap.
- Check the Oil Level: Look at the dipstick or the markings on the inside of the oil fill cap to determine the oil level. There may be indicators such as “Full” and “Add” or a range of acceptable oil levels. Ensure that the oil level is within the recommended range.
- Add Oil if Necessary: If the oil level is below the recommended range or near the “Add” mark, you will need to add oil. Use the appropriate type and grade of oil as specified in your owner’s manual. Slowly pour the oil into the oil fill opening, periodically checking the oil level with the dipstick or cap.
- Recheck the Oil Level: After adding oil, reinsert the dipstick or cap, and ensure it is secured tightly. Remove it again and check the oil level. Ensure that the oil level is now within the recommended range.
- Dispose of Excess Oil: If you accidentally overfill the oil, use a clean cloth or paper towel to soak up the excess oil. Be careful not to spill or contaminate the surrounding area.
- Properly Close the Oil Fill Opening: Once you are satisfied with the oil level, securely reattach the oil fill cap or insert the dipstick fully into the oil reservoir.
Checking the engine oil level regularly is important for the proper lubrication and functioning of your Husqvarna lawn mower’s engine. Refer to your owner’s manual for the recommended oil type, grade, and maintenance schedule.
If you are unsure or have any concerns, consult a professional or authorized service center.
How to Check the Safety Switch
To test the safety switch on your Husqvarna lawn mower, follow these step-by-step instructions:
- Preparation: Ensure that the lawn mower is turned off, the ignition key is removed, and the engine is cool. This will prevent accidental starts and ensure your safety during the testing process.
- Locate the Safety Switch: The safety switch is usually located on the control panel or near the handlebars of the lawn mower. It may be a lever or a button-type switch.
- Inspect the Safety Switch: Visually inspect the safety switch for any visible signs of damage, such as cracks, frayed wires, or loose connections. If you notice any issues, the safety switch may need to be replaced.
- Check the Neutral Position: If your lawn mower has a neutral position, ensure that the transmission is in neutral. This step may not be applicable to all models, as some mowers have safety switches that are only activated in certain positions.
- Engage the Safety Switch: Engage the safety switch by either pressing the button or moving the lever into the designated position. You may need to refer to your owner’s manual for specific instructions on how to engage the safety switch for your particular model.
- Attempt to Start the Lawn Mower: With the safety switch engaged, try starting the lawn mower as you normally would. Turn the ignition key or pull the starter cord, depending on the starting mechanism of your mower.
- Observe the Response: Pay close attention to how the lawn mower behaves when you attempt to start it. If the safety switch is functioning properly, the engine should not start or turn over. This is an indication that the safety switch is working and preventing the mower from starting when it should not.
- Disengage the Safety Switch: Release the button or move the lever back to its original position, disengaging the safety switch.
- Attempt to Start the Lawn Mower Again: After disengaging the safety switch, try starting the lawn mower once more. The engine should now be able to start normally, indicating that the safety switch is allowing the mower to start when it should.
Testing the safety switch is an important part of ensuring the proper operation and safety of your Husqvarna lawn mower. If you encounter any issues or suspect that the safety switch is not working correctly, it is recommended to consult a professional or authorized service center for further inspection and potential replacement.
Husqvarna Lawn Mower Won’t Start F.A.Q.
Q1. Why won’t my Husqvarna lawn mower start?
A: There can be several reasons why a Husqvarna lawn mower won’t start. It could be due to a dead battery, a faulty spark plug, clogged air filter, fuel supply issues, problems with the ignition system, or a malfunctioning safety switch.
Q2: How can I tell if the battery is causing the starting issue?
A: To check the battery, ensure it is charged and securely connected. You can use a multimeter to measure the battery voltage. If the voltage is below the recommended range, it may need to be recharged or replaced.
Q3. What should I do if my Husqvarna lawn mower’s engine cranks but won’t start?
A: If the engine cranks but won’t start, it indicates that the problem may lie in the fuel or ignition system. Check the fuel filter, fuel lines, and carburetor for any blockages or malfunctions. Additionally, inspect the ignition coil and ensure that the spark plug is producing a strong spark. If necessary, clean or replace these components.
Q4. How often should I change the spark plug in my Husqvarna lawn mower?
A: It is generally recommended to change the spark plug in your Husqvarna lawn mower once per mowing season or after every 100 hours of operation. However, if you notice any signs of damage, wear, or poor performance, it is advisable to replace the spark plug sooner.
Q5. Can a faulty safety switch prevent my Husqvarna lawn mower from starting?
A: Yes, a faulty safety switch can prevent the lawn mower from starting. The safety switch is designed to disable the engine when certain conditions, such as the mower deck being engaged or the operator leaving the seat, are not met. If the safety switch is malfunctioning or not engaged properly, it can disrupt the starting process. Testing the safety switch and ensuring its proper functioning is important in troubleshooting a no-start issue.
Q6: How often should I change the air filter on my Husqvarna lawn mower?
A: It is recommended to clean or replace the air filter annually or after every 25 hours of use, depending on the operating conditions. A clogged air filter can restrict airflow to the engine and cause starting issues.
Q7: Can a clogged fuel filter prevent the lawn mower from starting?
A: Yes, a clogged fuel filter can restrict fuel flow to the engine, resulting in starting problems. Inspect the fuel filter and replace it if it appears dirty or clogged.
Q8: How do I know if the ignition system is faulty?
A: If the spark plug is in good condition and properly gapped, but there is no spark when attempting to start the mower, it may indicate a problem with the ignition system. In such cases, it is recommended to consult a professional for further diagnosis and repair.
Q9: How often should I change the engine oil in my Husqvarna lawn mower?
A: It is generally recommended to change the engine oil in your Husqvarna lawn mower after the first five hours of use and then every 25 hours or annually, whichever comes first. Refer to your owner’s manual for the specific oil change intervals for your model.
Note: If you are unable to diagnose or resolve the issue with your Husqvarna lawn mower, it is recommended to consult the owner’s manual or seek assistance from a qualified technician or authorized service center.


My Husqvarna lawn mower will start initially, but if it stops it won’t start again. Why does this happen?
It sounds like the issue with your vehicle could be related to the carburetor or fuel system, but it’s also possible that the ignition or electrical components are causing the problem. To troubleshoot and determine the root cause, I suggest purchasing starting fluid from a reputable store, such as Walmart or an auto parts store.
Here’s how you can use the starting fluid to diagnose the issue: First, remove the spark plug and spray the starting fluid into the cylinder head hole where the plug screws in. Then, try to start the vehicle. If it starts consistently every time you spray the starting fluid and stops afterwards once it burns off, then the problem is likely on the fuel side, such as the carburetor, fuel lines, fuel filter, or a combination of these components.
On the other hand, if the vehicle fails to start repeatedly even when using the starting fluid, the issue is more likely on the electrical side. Potential culprits could be the spark plug, ignition coil, wires, recoil magneto pull, or other electrical components. I hope this breakdown helps you better understand and troubleshoot the issue with your vehicle. If it proves to be too complex or you need further assistance, I recommend reaching out to a professional mechanic for a more accurate diagnosis and proper repair.
What can I do if my Husqvarna lawn mower still won’t start after troubleshooting?
If you have checked the battery, fuel, spark plug, air filter, safety switches, and other components without success, it’s best to seek professional assistance from an authorized Husqvarna dealer or a qualified lawn mower technician. They have the expertise and diagnostic tools to identify and resolve complex issues.