- Service Table for Troubleshooting a Kubota Tractor That Won’t Start
- How to Check the Battery
- How to Inspect a Fuel System
- How to Inspect the Engine Oil Level
- Inspect the Spark Plug if Your Kubota Tractor Won’t Start
- How to Examine the Ignition System
- How to Examine the Air Filter if Kubota Tractor Won’t Start
- F.A.Q. for Kubota Tractor Won’t Start
Is your Kubota tractor refusing to start? Don’t worry, we’re here to help! A non-starting Kubota tractor can be frustrating, but with a little troubleshooting, you can often pinpoint the issue and get your tractor up and running again. In this guide, we will explore common reasons why a Kubota tractor won’t start and provide step-by-step instructions on how to diagnose and resolve the problem.
From checking the battery and fuel system to inspecting the ignition system and other components, we’ll guide you through the process so that you can get back to tackling your tasks with your reliable Kubota tractor. Let’s get started on troubleshooting the non-starting issue and get your Kubota tractor back in action!
Service Table for Troubleshooting a Kubota Tractor That Won’t Start
If your Kubota tractor won’t start, here are some troubleshooting steps you can take (service table for troubleshooting a Kubota tractor that won’t start).
| Service Step | Description |
|---|---|
| 1. Check for error codes |
|
| 2. Visual Inspection |
|
| 3. Battery Check |
|
| 4. Fuel System Inspection |
|
| 5. Engine Oil Level Check |
|
| 6. Spark Plug Inspection |
|
| 7. Safety Switches Check |
|
| 8. Ignition System Examination |
|
| 9. Air Filter Inspection |
|
| 10. Compression Test |
|
| 11. Fuel Consumption |
|
Remember, this table provides general steps for troubleshooting a Kubota tractor that won’t start. The specific procedures may vary depending on the Kubota tractor model and year. Always refer to the tractor’s manual or seek assistance from a qualified Kubota technician for accurate diagnosis and troubleshooting.
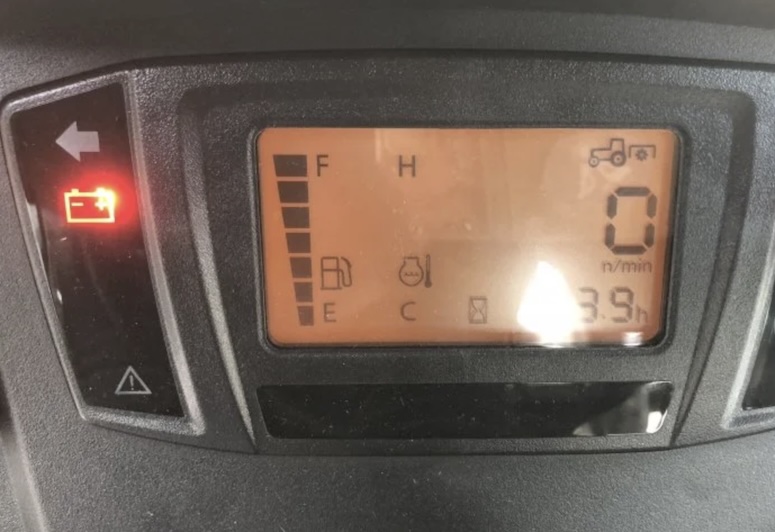
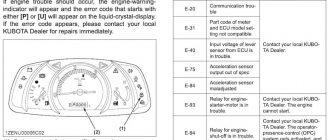
When a Kubota tractor experiences a fault or malfunction that prevents it from starting, the onboard diagnostic system may detect the issue and store corresponding error codes in its memory. If no error codes are displayed on the tractor dashboard, you will need to use of a Kubota Diagmaster diagnostic tool kit to retrieve them.
To check for error codes on your tractor when it doesn’t start, you would need to connect a Kubota Diagmaster (or compatible diagnostic tool) to the tractor’s diagnostic port. This tool can read the error codes stored in the tractor’s engine control unit (ECU) and provide information about the detected faults or malfunctions. If you don’t have access to a diagnostic tool or are unsure how to use one, consider seeking assistance from a Kubota dealer or qualified technician who can diagnose and address the problem for you.
How to Check the Battery
Here’s a step-by-step instruction on how to check the battery if your Kubota tractor won’t start:
- Safety Precautions: Ensure that the tractor is turned off and the ignition key is in the off position. Put on safety gloves and protective eyewear before proceeding.
- Locate the Battery: Identify the battery’s location on the tractor. Typically, the battery is located under the seat or in a compartment on the side of the tractor.
- Inspect the Battery: Check for any visible signs of damage, such as corrosion, leakage, or loose connections. If you notice any damage, it may indicate a battery problem that needs further attention.
- Clean the Battery Terminals: If there is corrosion or dirt on the battery terminals, use a wire brush or a battery terminal cleaner to gently scrub the terminals and remove any build-up. Ensure that the terminals are clean and free of debris.
- Check the Battery Voltage: Use a multimeter or voltmeter to measure the battery’s voltage. Set the meter to the DC voltage setting and touch the positive (+) probe to the positive terminal of the battery and the negative (-) probe to the negative terminal. A fully charged battery typically reads around 12.6 to 12.8 volts. If the reading is significantly lower, the battery may be weak or discharged.
- Charge the Battery: If the battery voltage is low, recharge the battery using an appropriate battery charger. Follow the charger manufacturer’s instructions to safely charge the battery. Make sure to disconnect the battery from the tractor before charging.
- Load Test the Battery (Optional): If you have access to a battery load tester, you can perform a load test to determine the battery’s overall condition. Connect the load tester to the battery according to the tester’s instructions and apply the appropriate load. Monitor the voltage reading to see if it drops significantly, indicating a weak battery that needs replacement.
- Reinstall and Secure the Battery: Once the battery is fully charged and verified to be in good condition, carefully reinstall it in the tractor. Ensure that the battery connections are tight and secure.
- Reconnect Cables: Attach the positive (+) battery cable to the positive terminal and the negative (-) cable to the negative terminal. Tighten the cable connections securely.
- Start the Tractor: Attempt to start the Kubota tractor and observe if the issue is resolved. If the tractor still won’t start, further investigation or professional assistance may be necessary.
Remember to always exercise caution and follow safety guidelines when working with batteries. If you’re unsure or uncomfortable performing these steps, it’s advisable to seek assistance from a qualified technician or Kubota service center.
How to Inspect a Fuel System
Here’s a step-by-step instruction on how to perform a fuel system inspection if your Kubota tractor won’t start:
- Safety Precautions: Ensure that the tractor is turned off and the engine is cool. Work in a well-ventilated area away from any open flames or sources of ignition.
- Locate the Fuel System Components: Identify the key components of the fuel system, including the fuel filter, fuel lines, and fuel tank. Refer to the tractor’s manual for the exact locations.
- Check the Fuel Level: Ensure that the fuel tank has an adequate amount of fuel. If the fuel level is low, refill the tank with clean and fresh fuel.
- Inspect the Fuel Lines: Visually inspect the fuel lines for any signs of damage, such as cracks, leaks, or kinks. Pay attention to the connections at the fuel filter, fuel pump, and carburetor (if applicable). If you notice any issues, replace the damaged fuel lines.
- Check the Fuel Filter: Locate the fuel filter and inspect it for any clogs or contaminants. If the filter appears dirty or clogged, it may be restricting fuel flow and causing the starting issue. Replace the fuel filter with a new one if necessary, following the manufacturer’s recommendations.
- Clear Fuel Line Blockages: If you suspect a blockage in the fuel line, carefully disconnect the line at the appropriate points (e.g., fuel filter or carburetor). Use compressed air or a small, clean piece of wire to clear any debris or blockages from the line. Reconnect the fuel line securely.
- Verify Fuel Pump Operation (if applicable): If your Kubota tractor has a fuel pump, ensure that it is functioning properly. Check for any signs of damage or leaks around the fuel pump. If the fuel pump is not working correctly, it may need to be replaced.
- Drain and Replace Stale Fuel (if needed): If the tractor has been sitting idle for an extended period, the fuel may have gone stale, which can cause starting issues. Consider draining the old fuel from the tank and replacing it with fresh, clean fuel.
- Prime the Fuel System (if applicable): Some Kubota tractors may have a priming pump or priming procedure to ensure proper fuel flow. Follow the tractor’s manual instructions to prime the fuel system if required.
- Start the Tractor: After performing the fuel system inspection and any necessary repairs or maintenance, attempt to start the Kubota tractor. If the tractor still won’t start, further investigation or professional assistance may be necessary.
Always refer to the tractor’s manual for specific instructions and guidelines related to the fuel system inspection and maintenance procedures.
How to Inspect the Engine Oil Level
Here’s a step-by-step instruction on how to check the engine oil level if your Kubota tractor won’t start:
- Safety Precautions: Ensure that the tractor is turned off and the engine is cool. Park the tractor on a level surface and engage the parking brake.
- Locate the Engine Oil Dipstick: Refer to the tractor’s manual to find the engine oil dipstick. It is typically located near the engine block and has a bright-colored handle for easy identification.
- Remove the Dipstick: Pull the dipstick out of its tube and wipe off any oil residue using a clean cloth or paper towel.
- Reinsert the Dipstick: Insert the dipstick back into the tube completely, making sure it is fully seated.
- Remove the Dipstick Again: Pull the dipstick out of the tube and observe the oil level. The dipstick has markings indicating the minimum and maximum oil levels.
- Check the Oil Level: Inspect the oil level on the dipstick. Ideally, the oil level should be between the minimum and maximum marks. If the oil level is below the minimum mark, it indicates a low oil level.
- Add or Replace Oil: If the oil level is low, add the recommended type and quantity of engine oil through the oil fill cap or designated oil fill port. Avoid overfilling the engine with oil, as it can cause damage. Refer to the tractor’s manual for the specific oil type and quantity required.
- Recheck the Oil Level: After adding or replacing the oil, reinsert the dipstick, and then pull it out again. Ensure that the oil level is now within the acceptable range.
- Inspect the Oil Quality: While checking the oil level, also inspect the oil’s color and consistency. Fresh engine oil should have a clear, amber color. If the oil appears excessively dark, gritty, or has a burnt smell, it may be time to perform an oil change.
- Start the Tractor: Once you’ve confirmed the oil level is correct and the oil is in good condition, attempt to start the Kubota tractor. If the tractor still won’t start, further investigation or professional assistance may be necessary.
Always refer to the tractor’s manual for specific instructions, oil specifications, and maintenance guidelines.
Inspect the Spark Plug if Your Kubota Tractor Won’t Start
Here’s a step-by-step instruction on how to inspect the spark plug if your Kubota tractor won’t start:
- Safety Precautions: Ensure that the tractor is turned off and the engine is cool. Park the tractor on a level surface and engage the parking brake. Remove the ignition key to prevent accidental starting.
- Locate the Spark Plug: Refer to the tractor’s manual to find the spark plug(s) location. Depending on the engine configuration, you may have one or multiple spark plugs.
- Remove the Spark Plug Boot: Gently grasp the spark plug boot, which is the rubber or plastic covering over the spark plug. Twist and pull upward to remove the boot from the spark plug.
- Clean the Surrounding Area: Before removing the spark plug, use compressed air or a clean cloth to remove any dirt, debris, or loose particles around the spark plug base. This helps prevent debris from falling into the cylinder when the plug is removed.
- Remove the Spark Plug: Using a spark plug socket and ratchet or a spark plug wrench, carefully loosen and remove the spark plug by turning it counterclockwise. Slowly lift the spark plug out of the cylinder.
- Inspect the Spark Plug: Examine the spark plug for any signs of damage or wear. Check the electrode (the small metal tip) for erosion, deposits, or excessive carbon buildup. The electrode should have a sharp edge and appear clean.
- Clean the Spark Plug (if necessary): If the spark plug is dirty or has carbon deposits, use a wire brush or a specialized spark plug cleaner to gently clean the electrode and remove any carbon buildup. Avoid using abrasive materials that could damage the plug.
- Check the Spark Plug Gap: Use a spark plug gap tool or feeler gauge to measure the gap between the center electrode and the ground electrode. Refer to the tractor’s manual for the recommended gap specification. Adjust the gap by carefully bending the ground electrode, if necessary, to match the correct measurement.
- Inspect the Insulator: Examine the insulator, which is the ceramic part of the spark plug. Look for cracks, chips, or signs of damage. If the insulator is damaged, it is recommended to replace the spark plug.
- Reinstall the Spark Plug: Carefully insert the spark plug back into the spark plug hole and hand-tighten it to avoid cross-threading. Use the spark plug socket and ratchet or spark plug wrench to tighten the plug securely. Attach the spark plug boot onto the spark plug until it clicks into place.
- Repeat for Additional Spark Plugs: If your tractor has multiple spark plugs, repeat steps 3 to 10 for each spark plug.
- Start the Tractor: Once you’ve inspected and cleaned/replaced the spark plug(s), attempt to start the Kubota tractor. If the tractor still won’t start, further investigation or professional assistance may be necessary.
Always refer to the tractor’s manual for specific instructions, spark plug specifications, and maintenance guidelines.
How to Examine the Ignition System
Here’s a step-by-step instruction on how to examine the ignition system if your Kubota tractor won’t start:
- Safety Precautions: Ensure that the tractor is turned off and the engine is cool. Park the tractor on a level surface and engage the parking brake. Remove the ignition key to prevent accidental starting.
- Inspect the Ignition Switch: Check the ignition switch to ensure it is in the “On” position. If the switch is loose or damaged, it may prevent the tractor from starting. Replace the ignition switch if necessary.
- Examine the Spark Plug Wires: Inspect the spark plug wires for any visible damage, such as cracks, cuts, or corrosion. Ensure that the wires are securely connected to the spark plugs and ignition coil(s). If there is any damage, replace the spark plug wires.
- Check the Ignition Coil(s): Locate the ignition coil(s) on the tractor’s engine. Inspect the coils for any signs of damage, such as cracks or loose connections. If the ignition coil(s) are faulty, it may cause a weak or no spark. Replace the ignition coil(s) if needed.
- Inspect the Distributor Cap and Rotor (if applicable): If your Kubota tractor has a distributor ignition system, check the distributor cap and rotor for any signs of wear, cracks, or carbon deposits. Clean or replace them as necessary.
- Verify Proper Grounding: Ensure that all the ignition system components, such as the ignition coil(s), distributor (if applicable), and spark plugs, are properly grounded. Clean any corrosion or debris from the grounding points to ensure good electrical connections.
- Test the Ignition Switch and Wiring: Use a multimeter to test the ignition switch and wiring for continuity and proper voltage. Follow the tractor’s manual or wiring diagram to identify the correct wires and perform the necessary tests. Repair or replace any faulty ignition switch or wiring.
- Check the Ignition Timing (if applicable): If your Kubota tractor has an adjustable ignition timing, verify that it is correctly set. Consult the tractor’s manual for the specific instructions on checking and adjusting the ignition timing.
- Inspect the Safety Interlock System: Some tractors have safety interlock systems that prevent the engine from starting if certain conditions are not met, such as the seat switch or PTO engagement. Ensure that all safety switches and interlock mechanisms are functioning properly.
- Reassemble and Start the Tractor: Once you’ve examined and addressed any issues with the ignition system components, reassemble any removed parts and attempt to start the Kubota tractor. If the tractor still won’t start, further investigation or professional assistance may be necessary.
Always refer to the tractor’s manual for specific instructions, wiring diagrams, and troubleshooting tips related to the ignition system. If you’re unsure or uncomfortable performing these steps, it’s advisable to seek assistance from a qualified technician or Kubota service center.
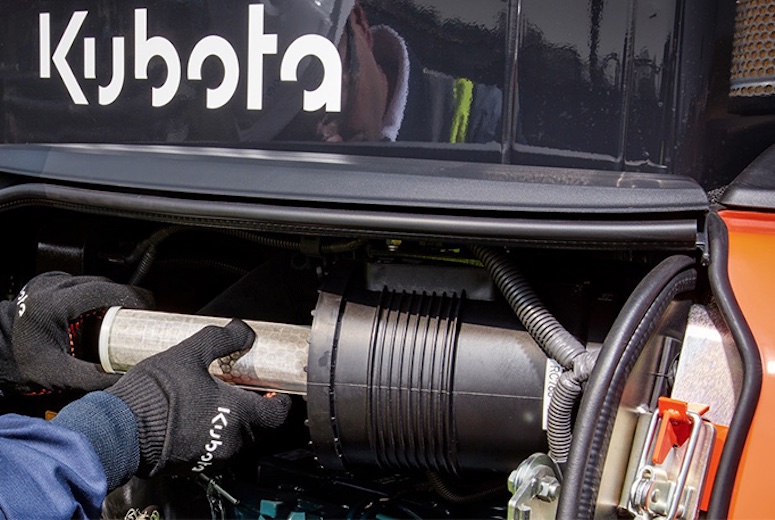
How to Examine the Air Filter if Kubota Tractor Won’t Start
Here’s a step-by-step instruction on how to inspect the air filter if your Kubota tractor won’t start:
- Safety Precautions: Ensure that the tractor is turned off and the engine is cool. Park the tractor on a level surface and engage the parking brake.
- Locate the Air Filter: Refer to the tractor’s manual to find the air filter housing. It is typically located near the engine and may be enclosed by a plastic or metal cover.
- Remove the Air Filter Cover: Using the appropriate tools (such as a screwdriver or socket wrench), remove the screws or clips that secure the air filter cover in place. Carefully lift off the cover to expose the air filter.
- Inspect the Air Filter: Take a close look at the air filter for any signs of dirt, debris, or damage. A dirty or clogged air filter can restrict airflow and affect the engine’s performance. If the filter appears excessively dirty or damaged, it may need to be cleaned or replaced.
- Clean the Air Filter (if reusable): If you have a reusable air filter, carefully remove it from the air filter housing. Gently tap the filter on a flat surface or use compressed air to remove loose debris. Avoid damaging the filter material during cleaning. If the filter is heavily clogged or damaged, it’s best to replace it.
- Replace the Air Filter (if necessary): If the air filter is not reusable or is excessively dirty or damaged, replace it with a new one. Ensure that the replacement filter is the correct type and size for your Kubota tractor. Follow the manufacturer’s instructions for proper installation.
- Inspect the Air Filter Housing: While the air filter is removed, inspect the air filter housing for any dirt, debris, or obstructions. Clean the housing if necessary to ensure proper airflow.
- Reinstall the Air Filter and Cover: Place the cleaned or new air filter back into the air filter housing, ensuring it fits properly. Replace the air filter cover and secure it with the screws or clips, tightening them snugly.
- Start the Tractor: Once you’ve inspected and cleaned/replaced the air filter, attempt to start the Kubota tractor. If the tractor still won’t start, further investigation or professional assistance may be necessary.
Always refer to the tractor’s manual for specific instructions, recommended air filter type, and maintenance guidelines.
F.A.Q. for Kubota Tractor Won’t Start
Frequently Asked Questions (FAQ) – Kubota Tractor Won’t Start:
Q1: Why won’t my Kubota tractor start?
A: There could be several reasons why your Kubota tractor won’t start. Some common causes include a dead battery, fuel supply issues, ignition system problems, or engine-related issues.
Q2: How can I determine if the battery is the problem?
A: You can start by checking if the battery is properly charged. Use a multimeter to measure the battery voltage. If the voltage is low or the battery is not holding a charge, it may need to be recharged or replaced.
Q3: What should I do if I suspect a fuel supply problem?
A: Check the fuel level in the tank to ensure it’s adequate. Inspect the fuel lines for any leaks or clogs. Consider draining any old or contaminated fuel and refilling the tank with fresh fuel. Additionally, check the fuel filter and replace it if necessary.
Q4: How do I troubleshoot the ignition system?
A: Start by inspecting the spark plugs for any signs of damage or fouling. Clean or replace the spark plugs as needed. Check the ignition switch, spark plug wires, and ignition coil(s) for any issues or loose connections. Verify that the safety interlock system is functioning correctly.
Q5: What can I do if the engine doesn’t turn over or makes unusual noises?
A: If the engine doesn’t turn over, it could indicate a starter motor or solenoid problem. Inspect the starter motor and connections for any faults. Unusual noises, such as grinding or clicking, might suggest a problem with the starter or flywheel. In such cases, professional assistance may be required.
Q6: Is there anything else I can check if the tractor still won’t start?
A: Ensure that the tractor is in neutral and the safety switches are engaged properly. Check for loose or corroded electrical connections. Verify that the air filter is clean and not causing airflow restrictions. If the tractor still won’t start, it’s recommended to consult a qualified technician for further diagnosis.
Note: The answers provided here are general guidelines and troubleshooting tips. Always refer to the Kubota tractor’s manual for specific instructions, safety precautions, and maintenance procedures. If you’re unsure or uncomfortable with any troubleshooting steps, it’s best to seek professional assistance from a Kubota service center.


Hi, my Kubota M8200 tractor won’t start. Is powered by Kubota V3300 3.3L diesel engine (4-stroke 4-cylinder direct Injection naturally aspirated liquid-cooled, rated power of 85.3 hp / 63.6 kW). Battery is good, fuel and oil are good. How can I understand the cause of an engine malfunction?
1) Test the starter motor: Check the starter motor to ensure it is engaging and cranking the engine. If you hear a clicking sound or no sound at all when turning the ignition key, it may indicate a faulty starter motor or a weak battery. Consider testing the starter motor or having it checked by a professional.
2) Inspect the fuel injection system: The fuel injection system plays a crucial role in delivering the correct amount of fuel to the engine. Issues with fuel injectors, such as clogs or malfunctioning injectors, can lead to starting problems. Consider having the fuel injection system inspected and tested by a qualified technician.
3) Check the engine compression: Low compression in the cylinders can make it difficult for the engine to start. A compression test can help determine if there are any issues with the piston rings, valves, or cylinder head gasket.
Consult the service manual: Refer to the Kubota M8200 tractor’s service manual for specific troubleshooting steps, diagnostic codes, and recommended maintenance procedures. The manual will provide detailed instructions for diagnosing and addressing engine-related problems. If you are unable to diagnose or resolve the engine malfunction on your own, it is recommended to seek assistance from a qualified technician or contact your local Kubota dealer. They have the expertise and specialized equipment to diagnose and repair engine-related issues for your specific model.